Emma Walshaw is the founder of First In Architecture and Detail Library. She has written a number of books aiming to facilitate a better understanding of construction and detailing. First In Architecture is a website providing resources and guides for architects and students.
Level thresholds can be very difficult to detail, with many standard details always showing a 150 mm step between the finished floor level and external ground level. However, level thresholds provide a future-proof solution to an aging population and ensure a building can be used and visited by everyone. They are also a very aesthetic solution to bridging the gap between indoors and outdoors.
Level thresholds are also a legal requirement for new build housing in the UK. This means that all external doors, front, rear and side, plus any sliding, bifold, French or terrace doors, must provide a level entrance and exit. Although it is not a building regulation requirement in renovation projects, some councils may require level thresholds as a planning condition within extensive renovation projects.
Below we look at key considerations when designing level thresholds to ensure water does not enter the building.
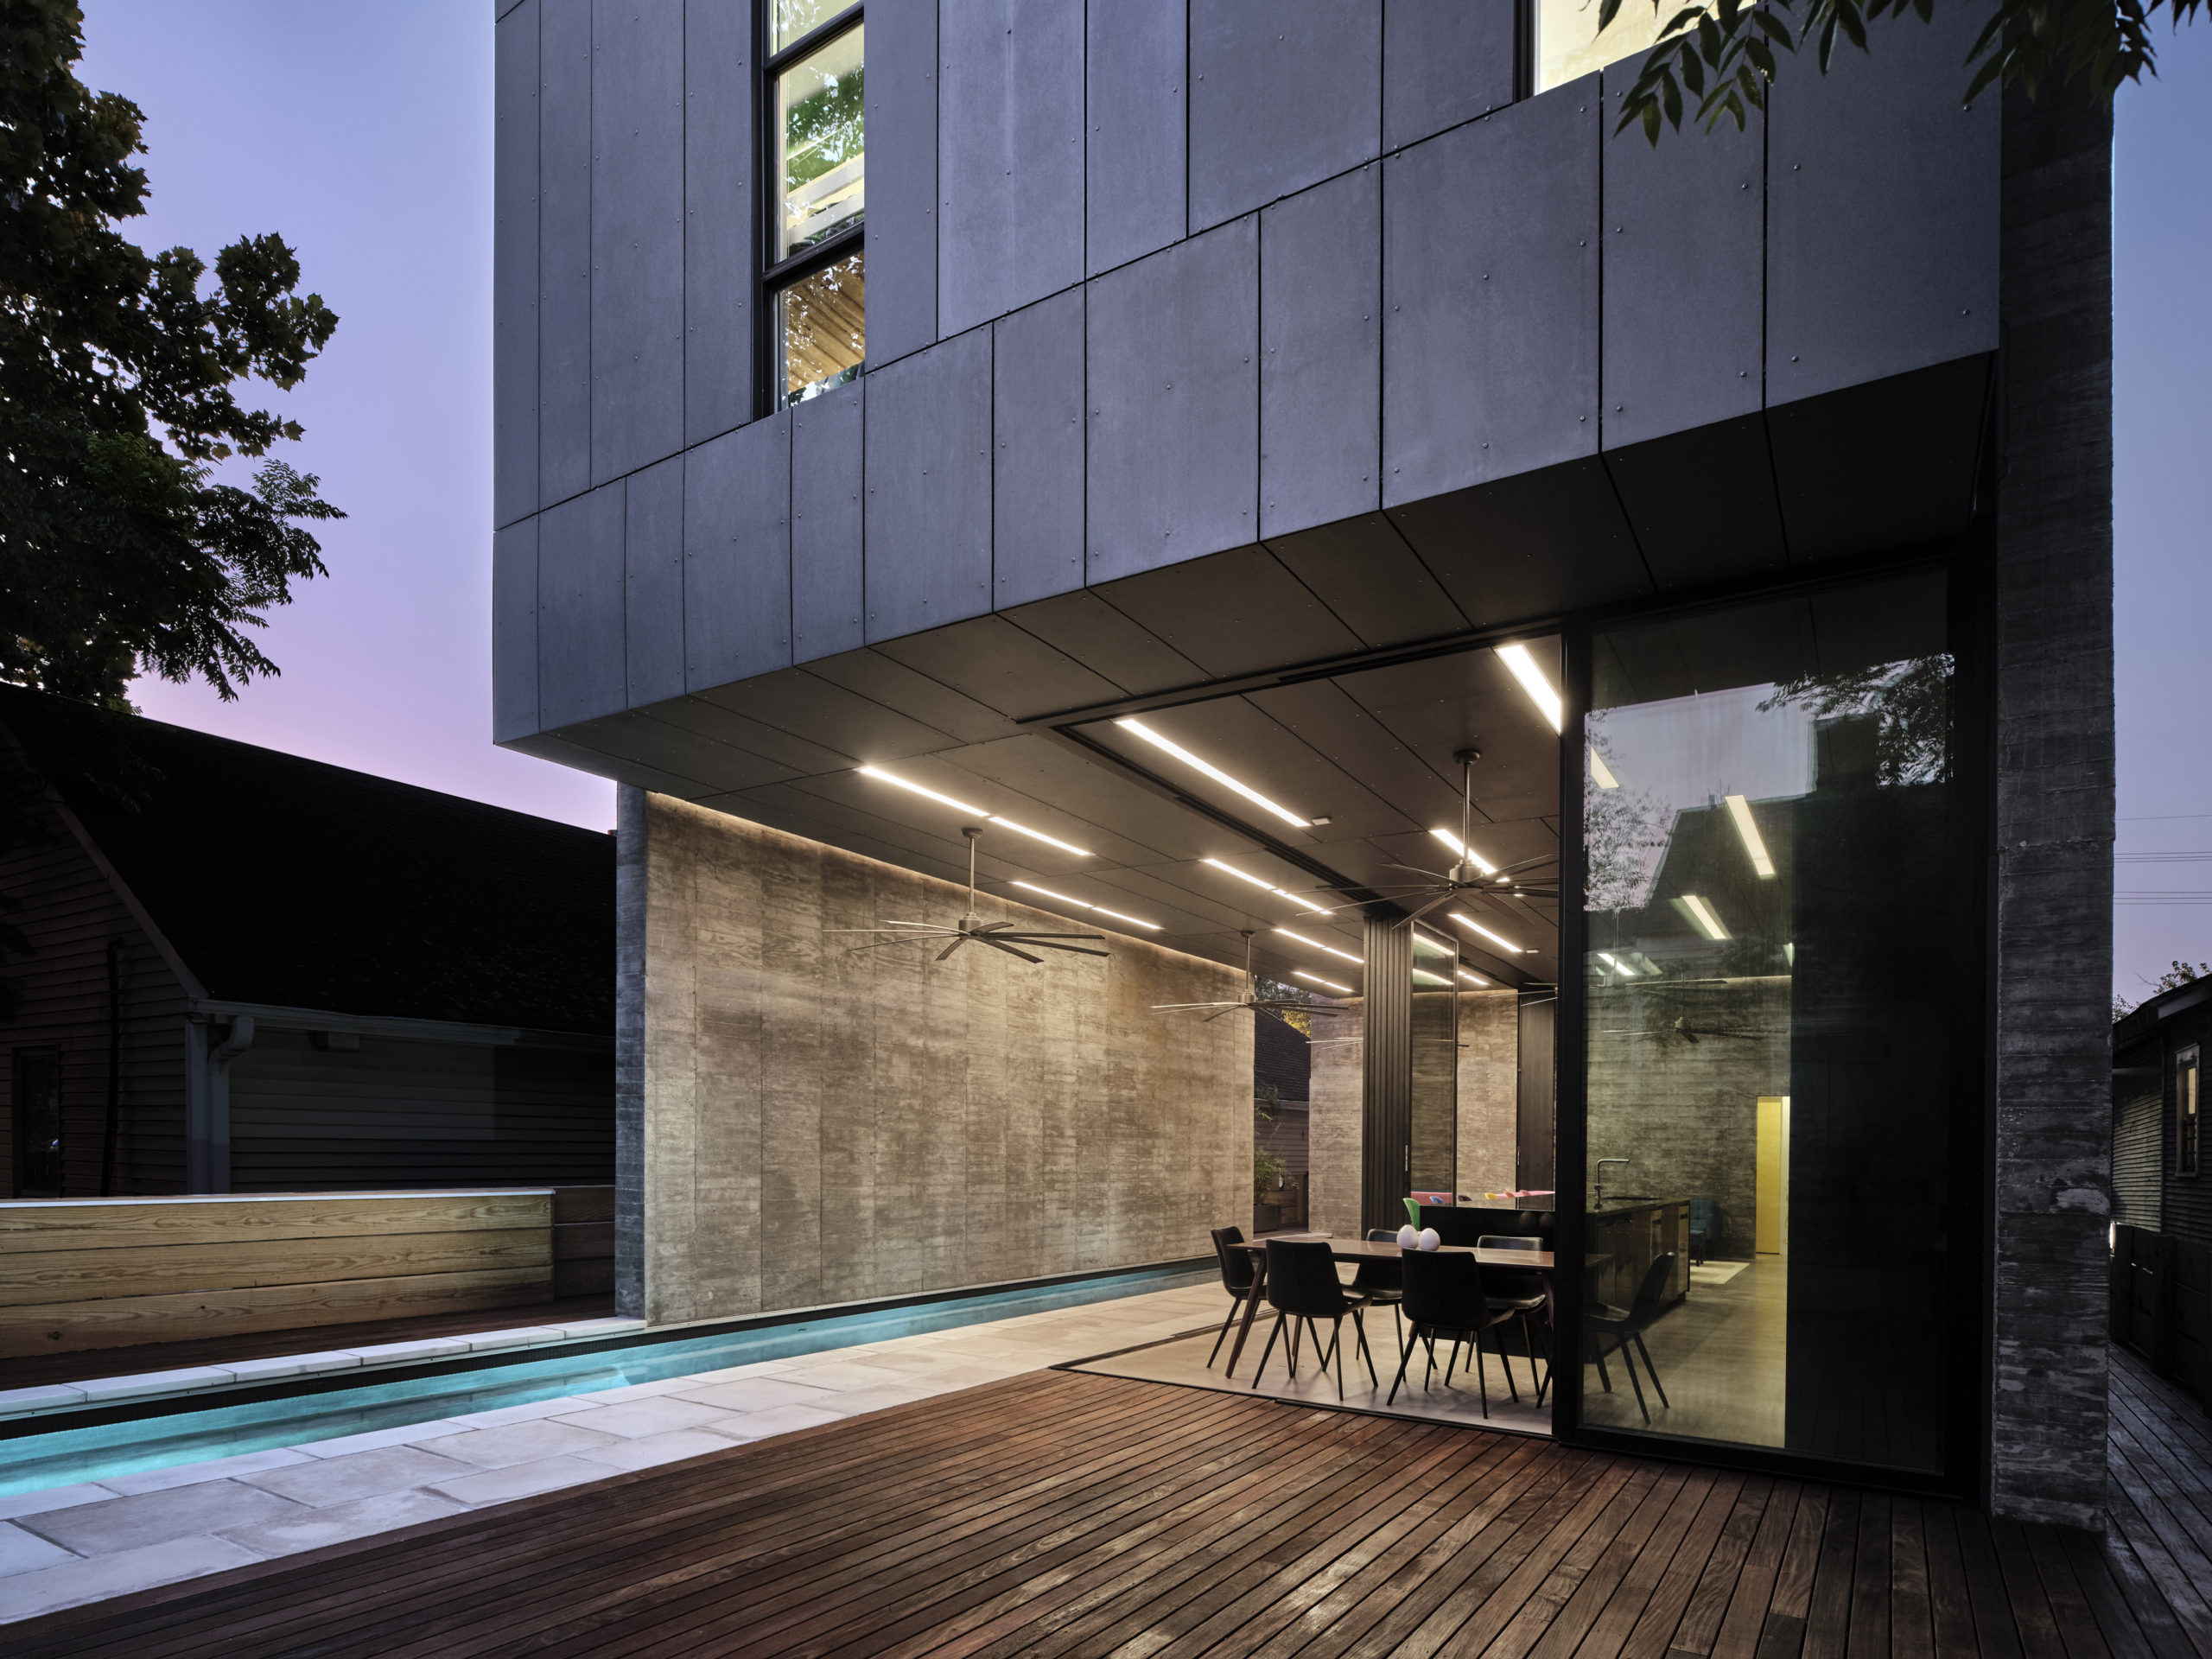
Bienville House by Nathan Fell Architecture, New Orleans, LA, United States
Accessible / Level Threshold
An accessible threshold is defined as a threshold this is level or, if raised, has a total height of not more than 15 mm, a minimum number of upstands and slopes and with any upstands higher than 5 mm chamfered.
Building Regulation Requirements
For single new build properties, Building Regulation Part M4(1) and M4(2) must be met. This requires all access to the dwelling to be step free, including the entrance, garden and any terraces. For larger developments or flats, the local council may require 10% of units to meet Building Regulations Part M4(3), meaning the unit is fully adaptable to a wheelchair user.
Whilst these Building Regulations do not need to be met in the case of an extension, some Local Authorities, Building Control and/or Approved Inspectors may require the need to meet Part M4(1) within a planning approval condition, requiring entrances and exits to the house to be accessible.
Ground Floor Thresholds
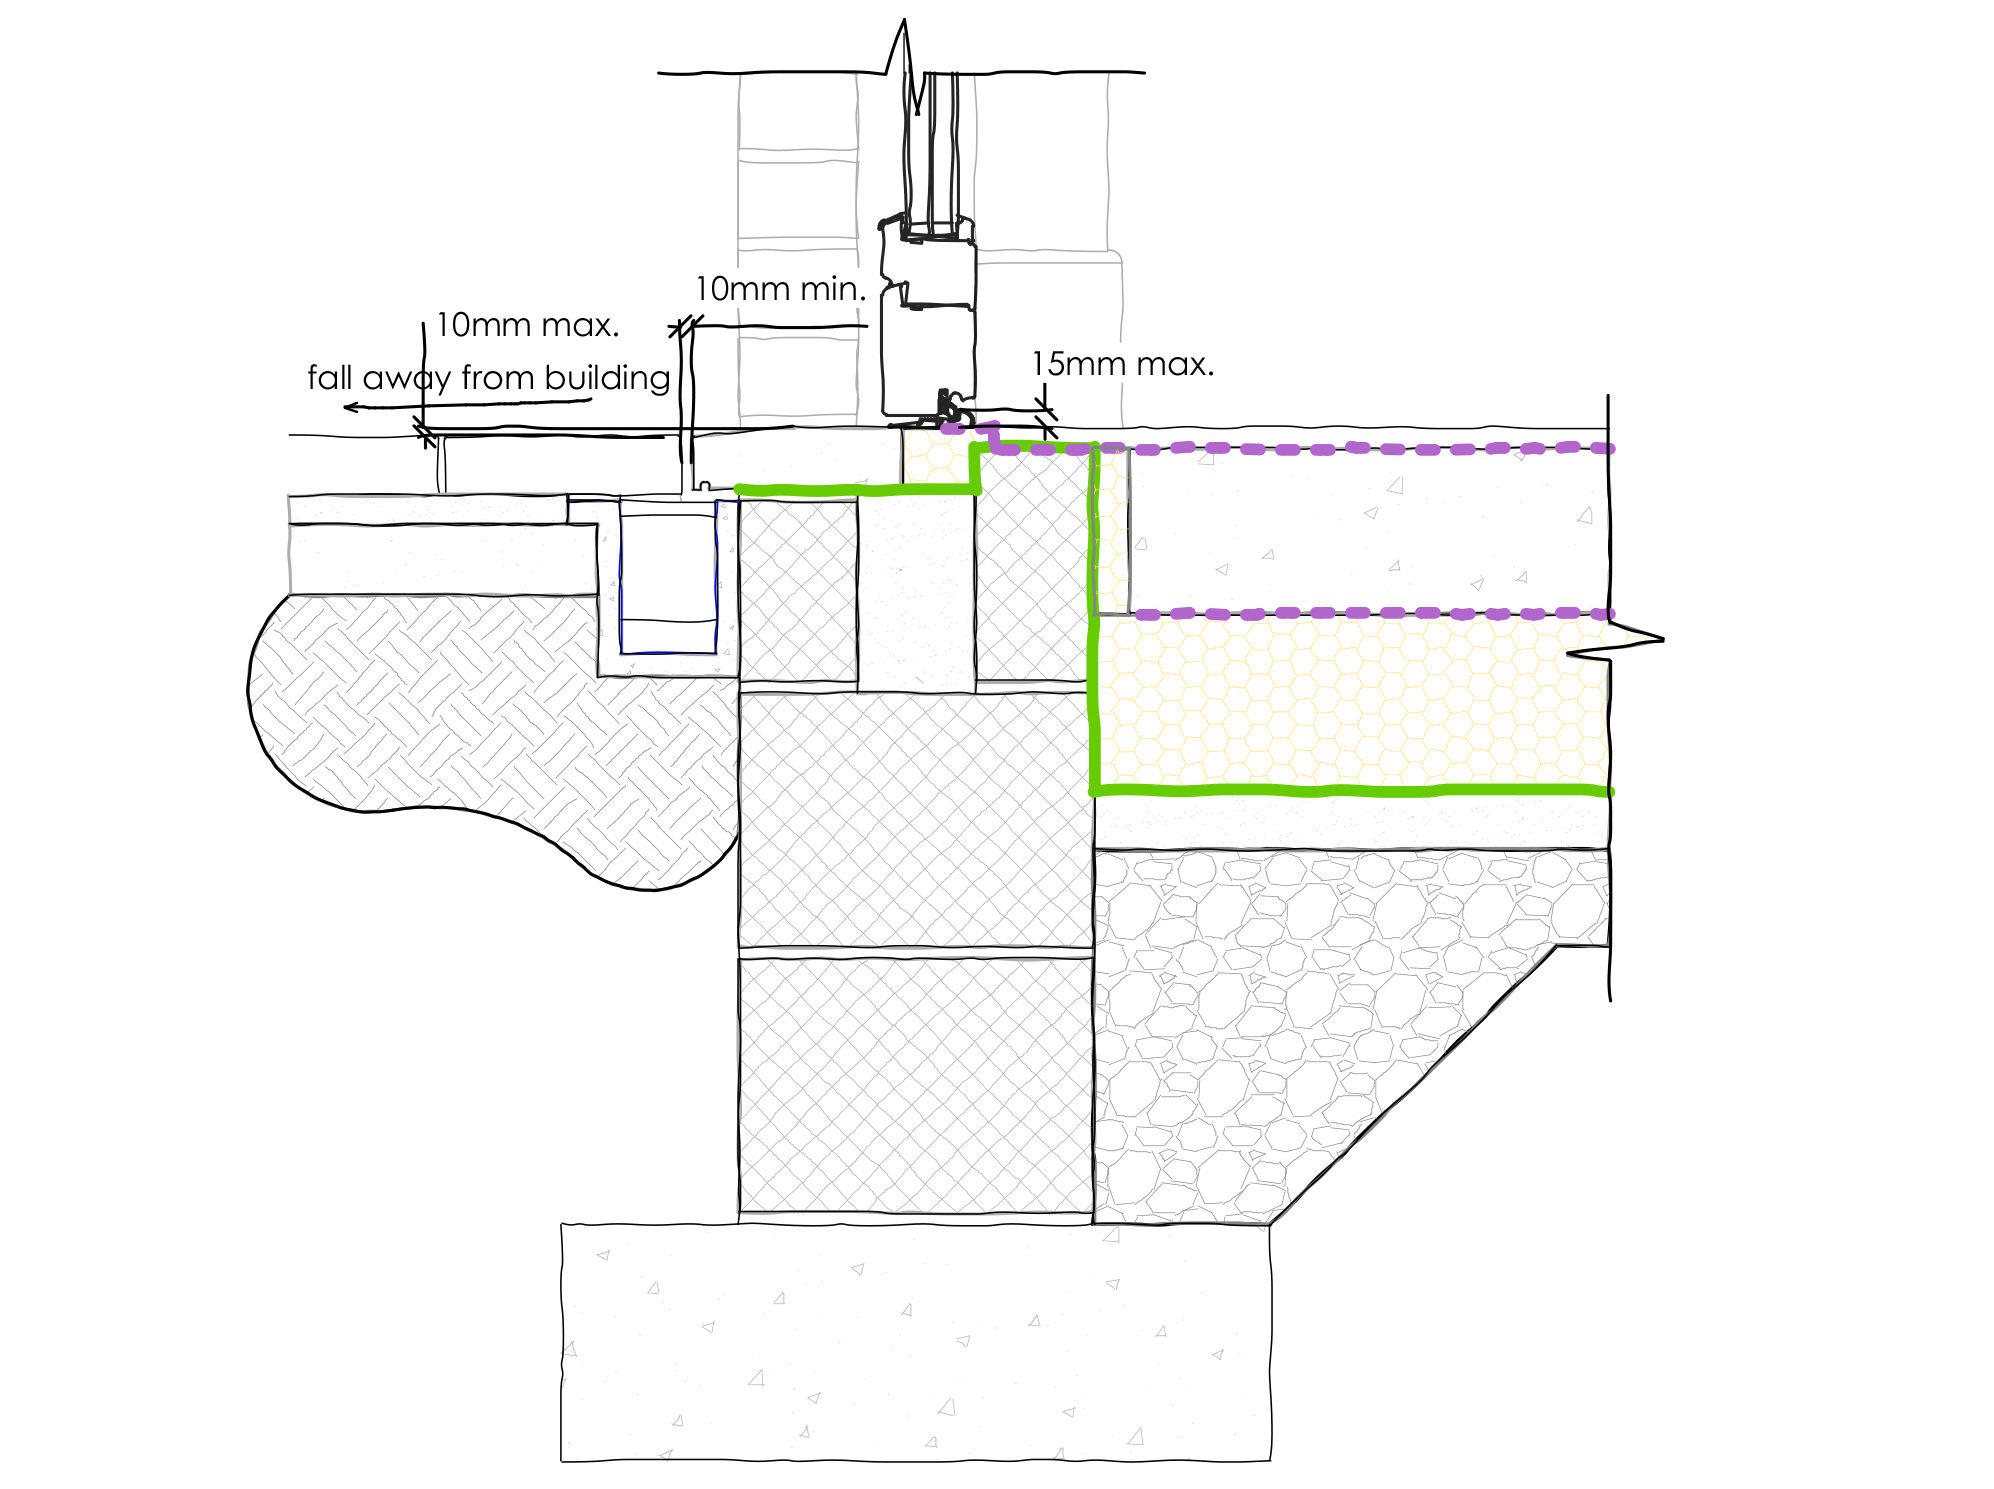
LHS – In-situ concrete threshold drain built under the sill and pavers, pavers to be removable or inspection hatch to be provided at either end of the drain for cleaning and maintenance.
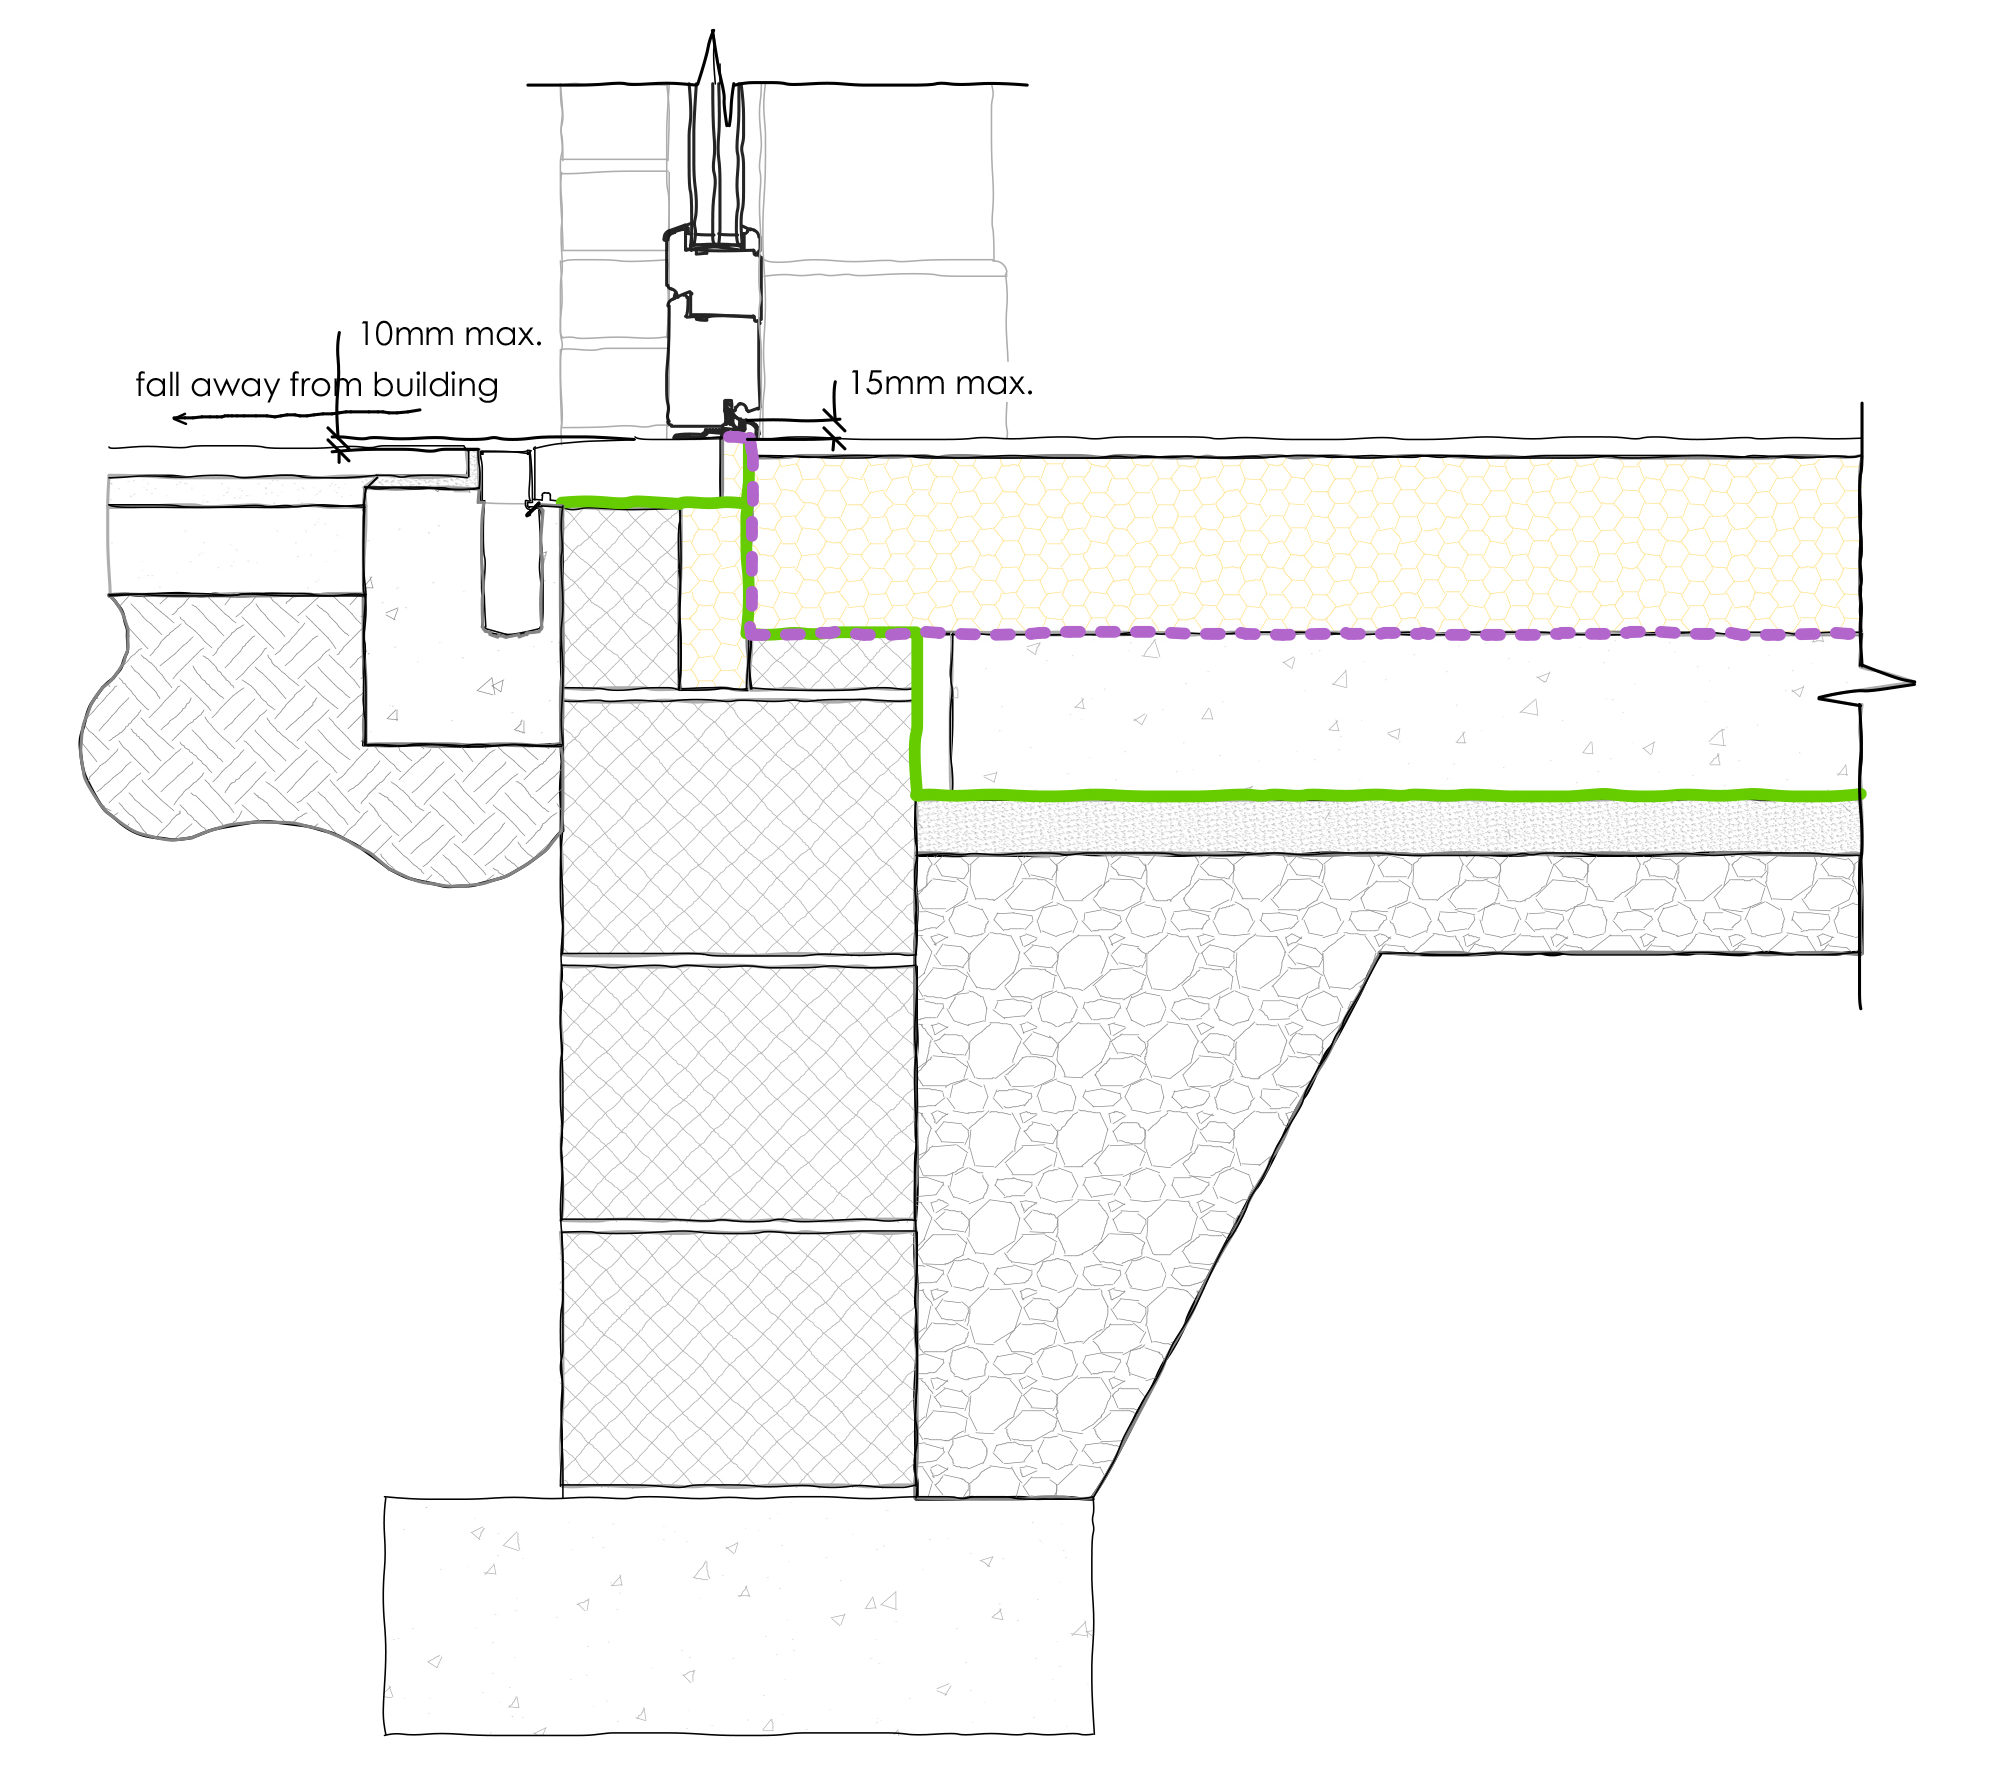
RHS – Aluminum threshold drain installed between pavers and sill with removable grill for inspection, drain with low level water entry of water infiltration between drain and sill.
There are various ways of designing a level threshold based on aesthetic, cost, structure, site conditions and location. However, there are a number of key features that all level thresholds should take into account.
Door — When specifying a door to be used in a level threshold, most manufacturers will state if the system is compliant with Part M of the Building Regulations. This guarantees that the element you step over is no more than a maximum 15 mm in height with no upstands of more than 5mm. Most sliding door manufactures provide frames with a completely level base frame. However, it is important to check the base frame of elements such as front and rear doors, especially in timber, as these will need special aluminum thresholds to be fully accessible.
Threshold Drainage — This is a building regulations requirement when designing this type of threshold. A drain can be installed between the sill and external landscaping flush with the level floor or hidden under the finishes. Many door manufacturers will even be able to provide a threshold drain for the door system chosen. This will help drain away any water near the drain as well as water which hits the door or glass and drains through the frame.
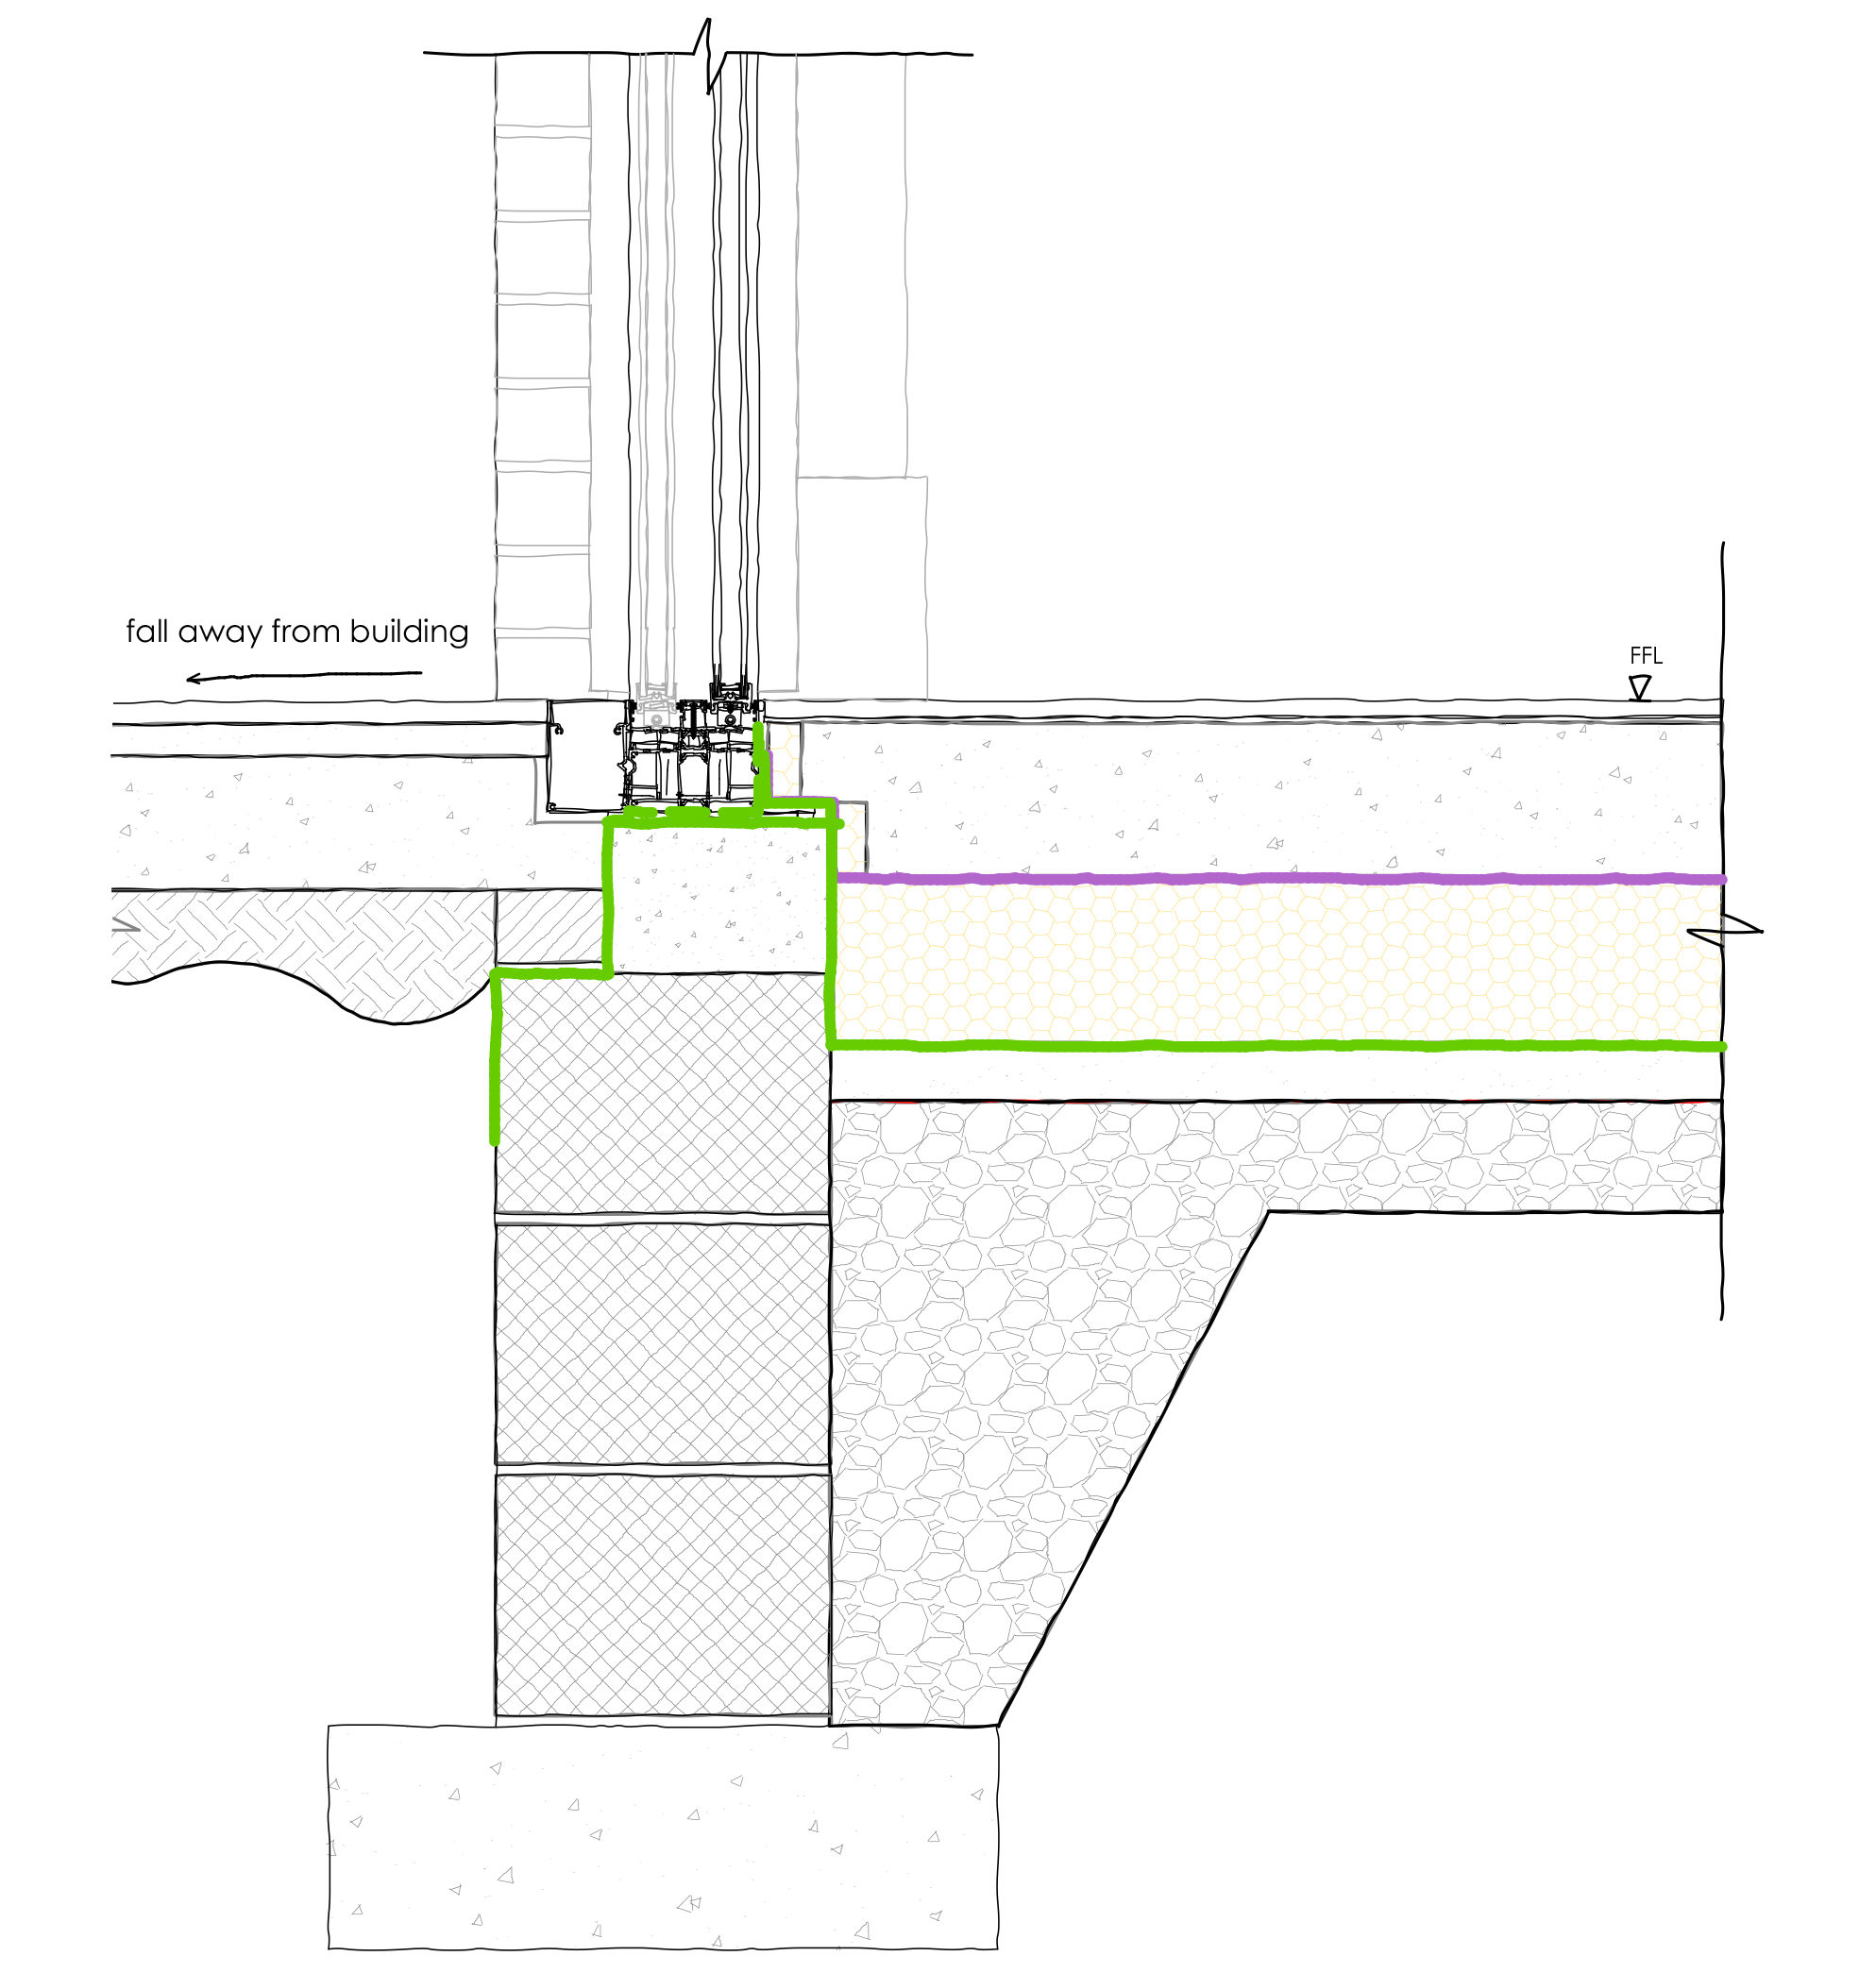
Threshold drain designed to clip into the aluminum sliding door system to drain both surface rain and rain hitting the glass and filtering through the window frame.
Waterproofing — Damp proof membranes should be draped up the door or window frame system at the point of the threshold. Water should be moved away from the threshold, by sloping eternal finishes away from the drain. To either side of the threshold, the damp proof course should be minimum of 150mm above ground level.
Key Points To Remember
- The threshold — including the door frame — should not be more than 15 mm in height overall. Of these 15 mm, there should be a minimum number of upstands and slopes, with any upstands higher than 5 mm chamfered.
- If the threshold is exposed to wind driven rain the landing can be up to 10 mm below the level of the sill if the sill is rounded or chamfered.
- The external landing should have a fall ratio of between 1:40 and 1:60.
- Ensure all water falls away from the doorway in a single direction.
- Build a drainage channel between the landing and the threshold.
- Ensure the channel discharges to a drainage system or land drainage such as a soakaway.
Timber Frame Key Considerations
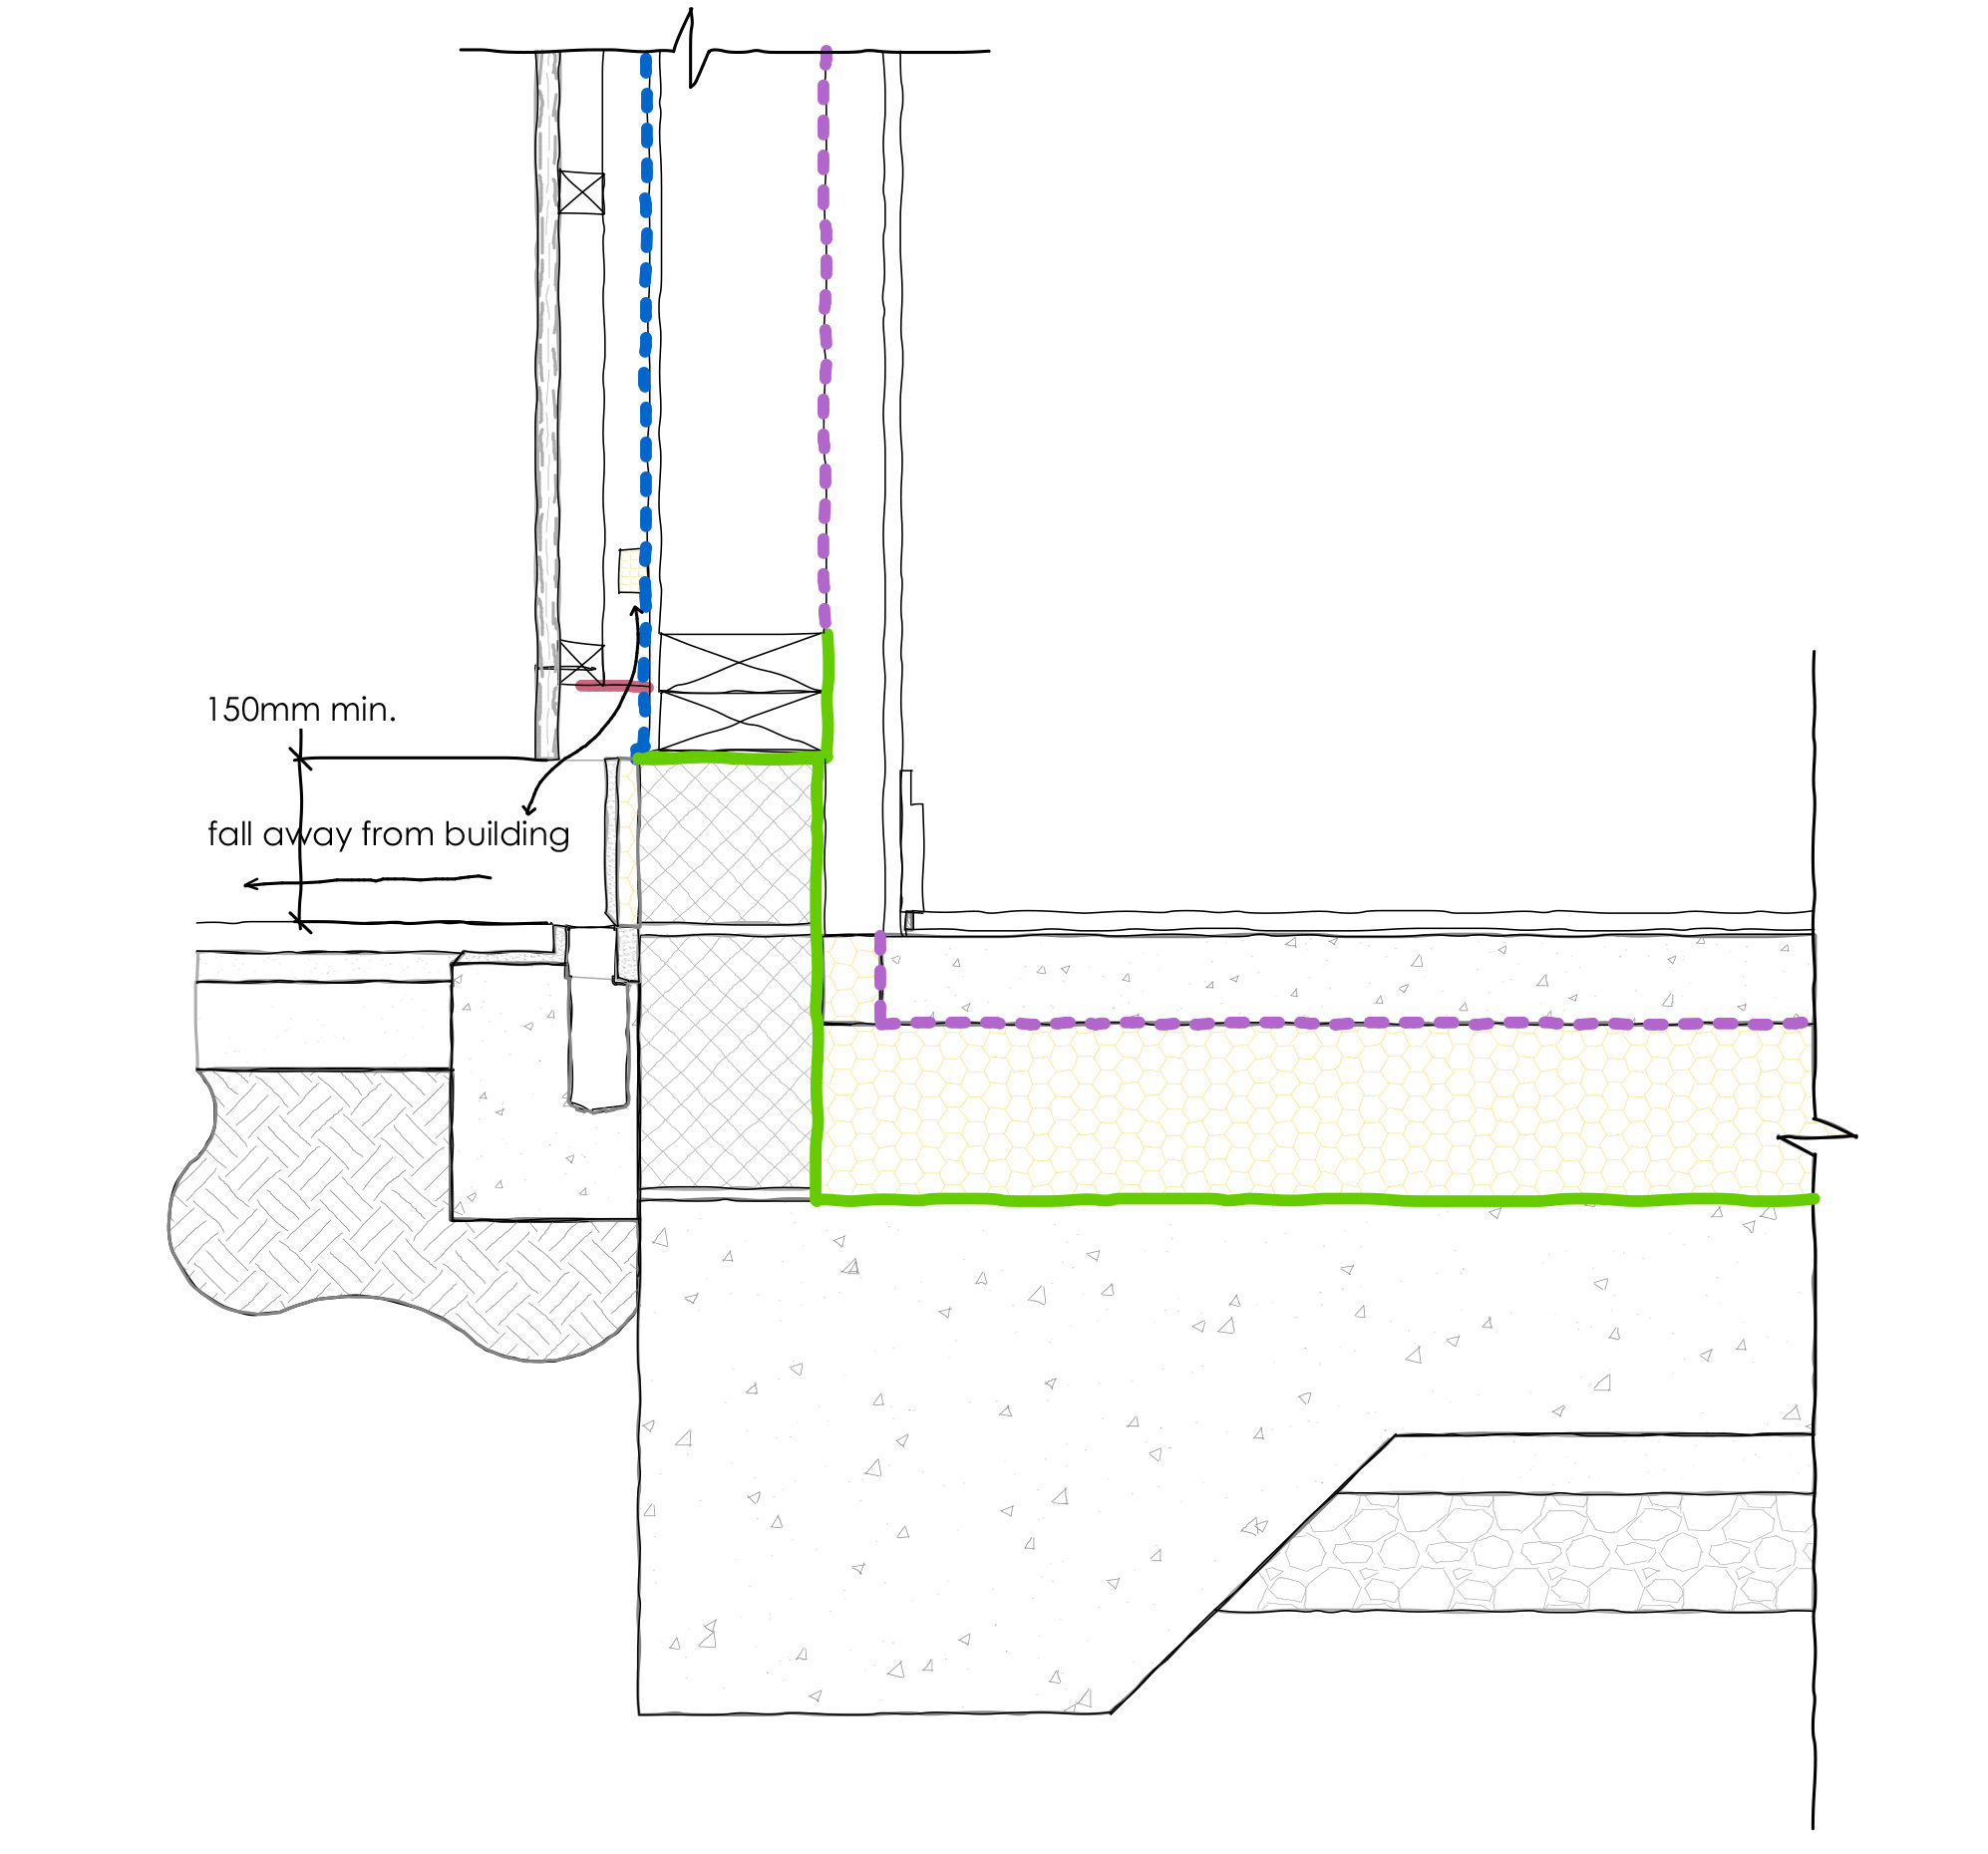
LHS – Timber frame construction either side of threshold showing concrete slab construction and raised foundation blocks 150 mm above finished floor level, with threshold drain.
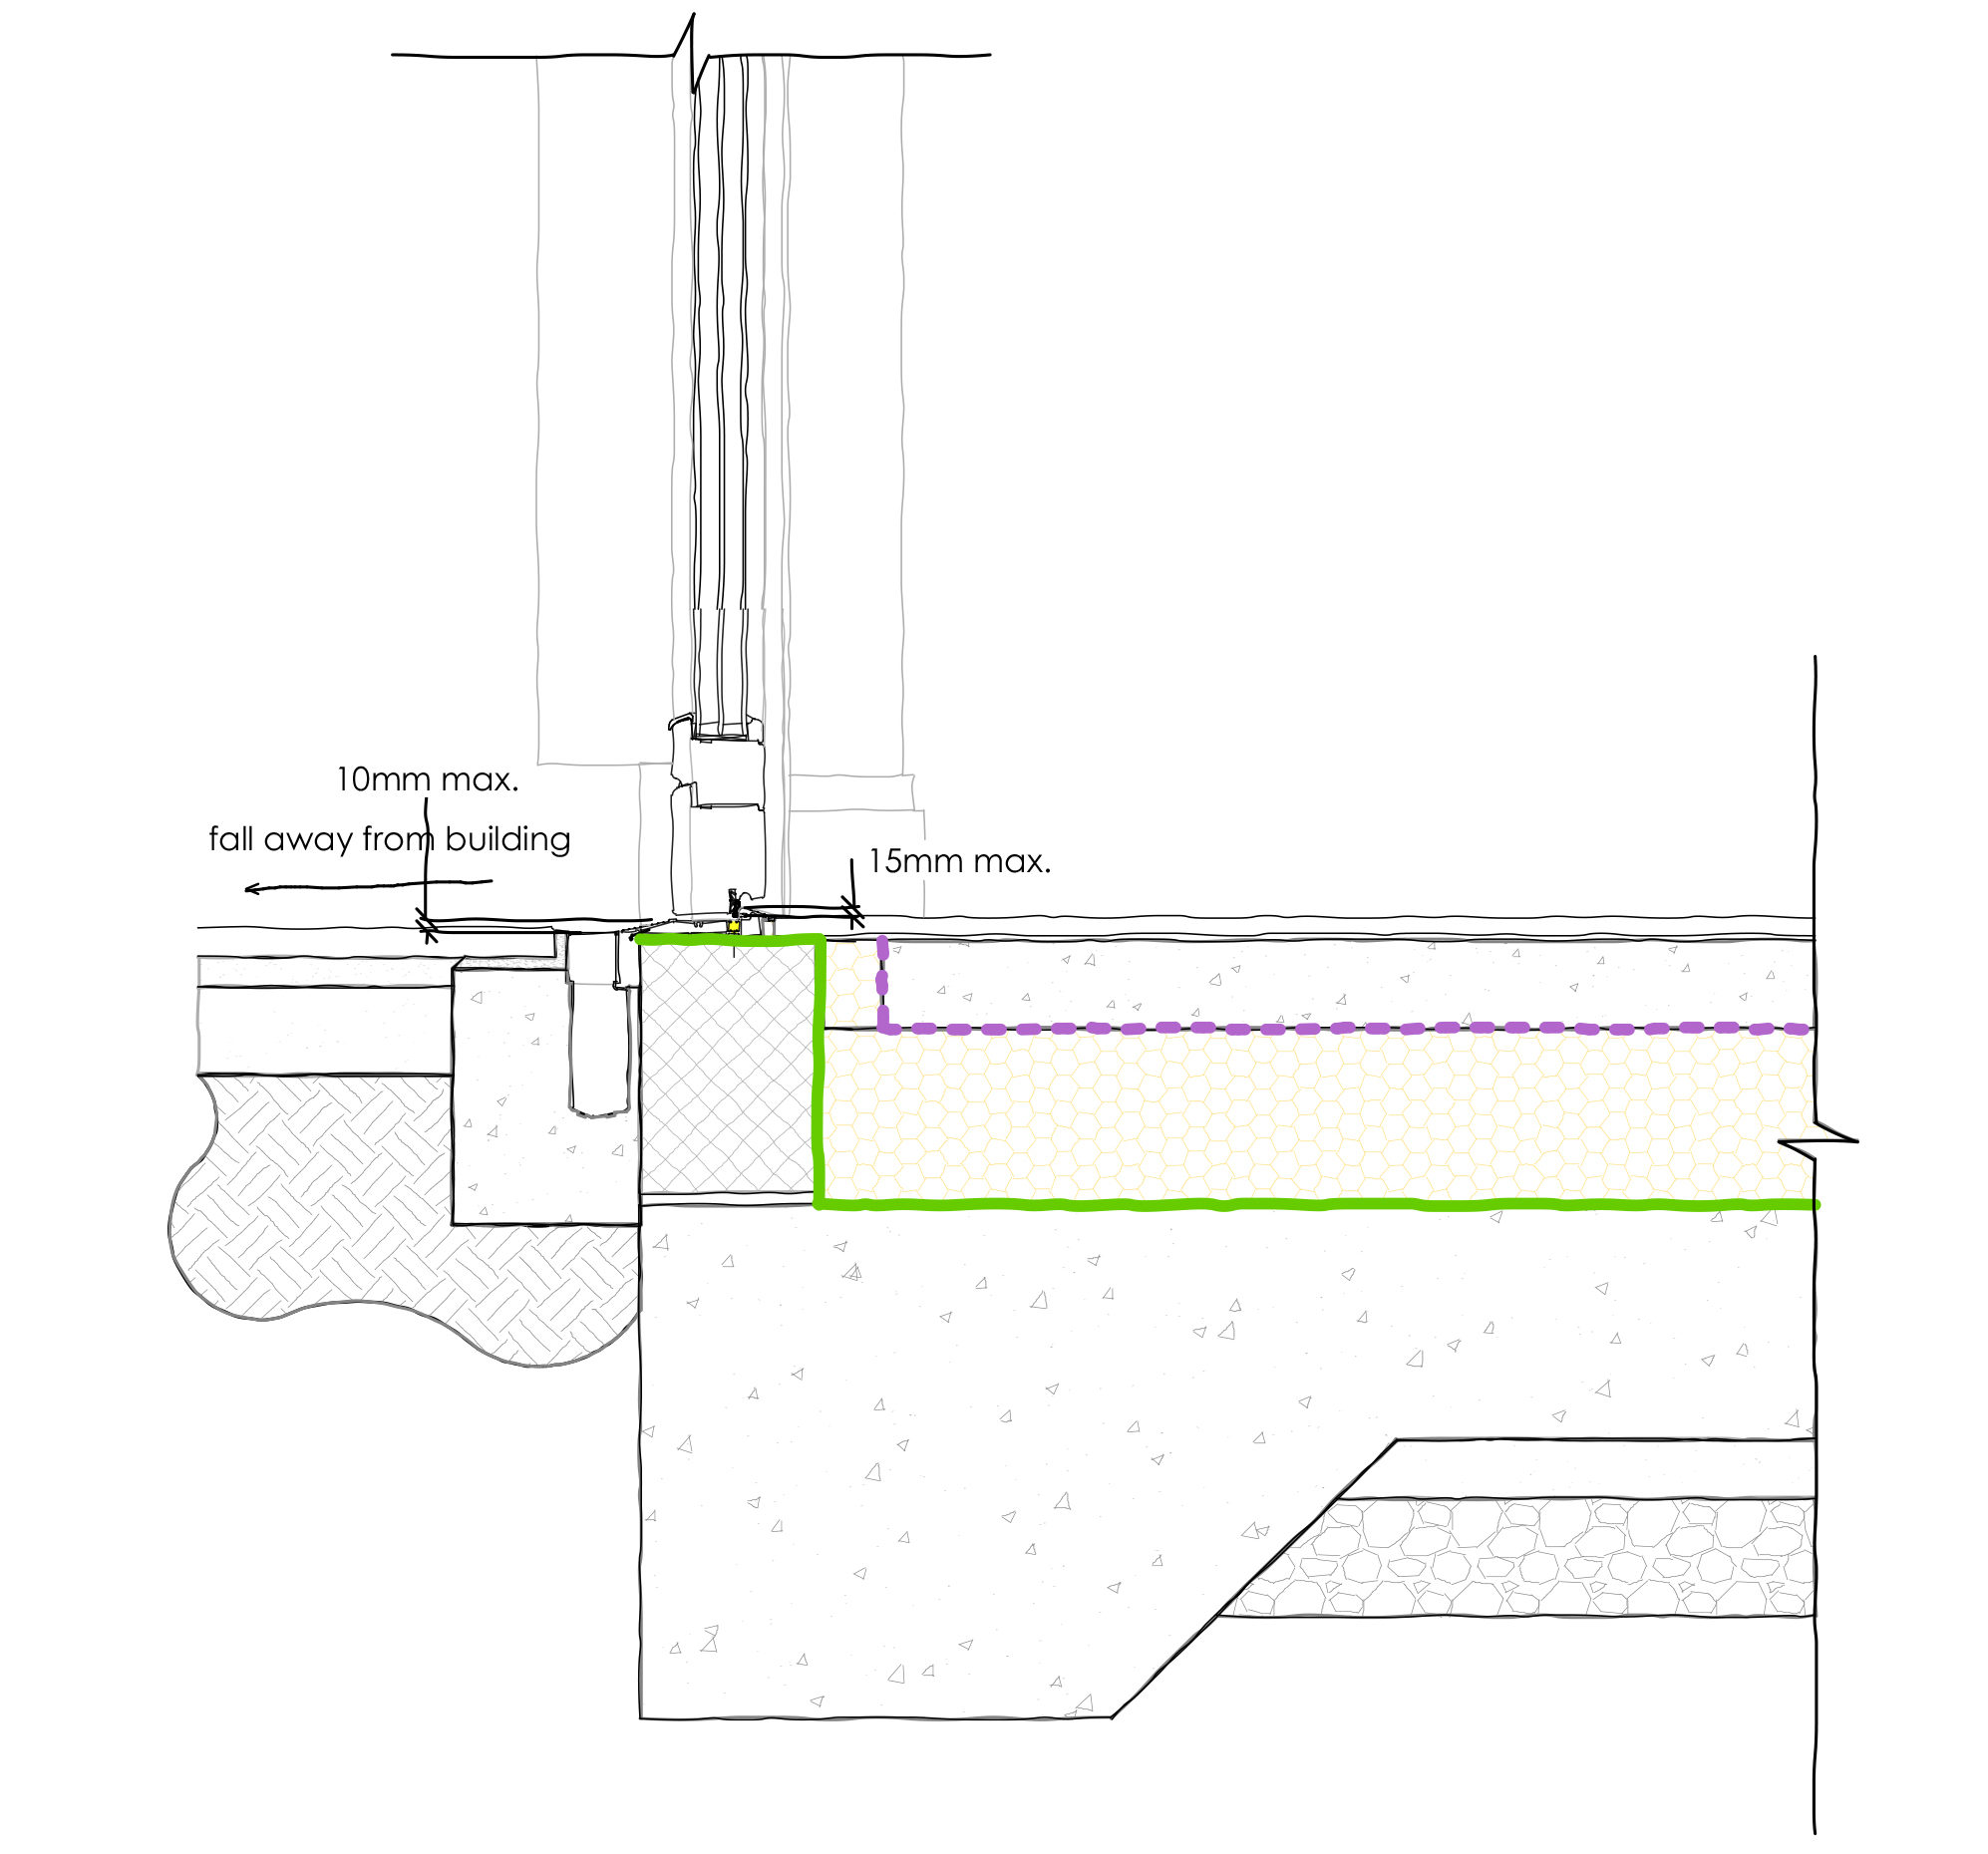
RHS – Level threshold with drain
Usually when designing for a timber frame structure, the timber frame should begin 150 mm above the ground level. This concept should be maintained when the ground level externally is level with the internal finish floor level. All the same considerations as above should be taken to account as well as the foundation or timber structure being raised 150 mm above the external ground level, usually 150 mm higher than the internal finished floor level.
Raised Terrace
Another way of preventing water ingress at this critical junction is to use a raised terrace such as paving slabs on pedestals. Whilst this is the best option if you have a raised terrace area, it is also used when the garden level is lower that your internal ground floor level, such as with a beam and block construction. Further details can be found in the following section.
Level Balcony and Terrace Thresholds
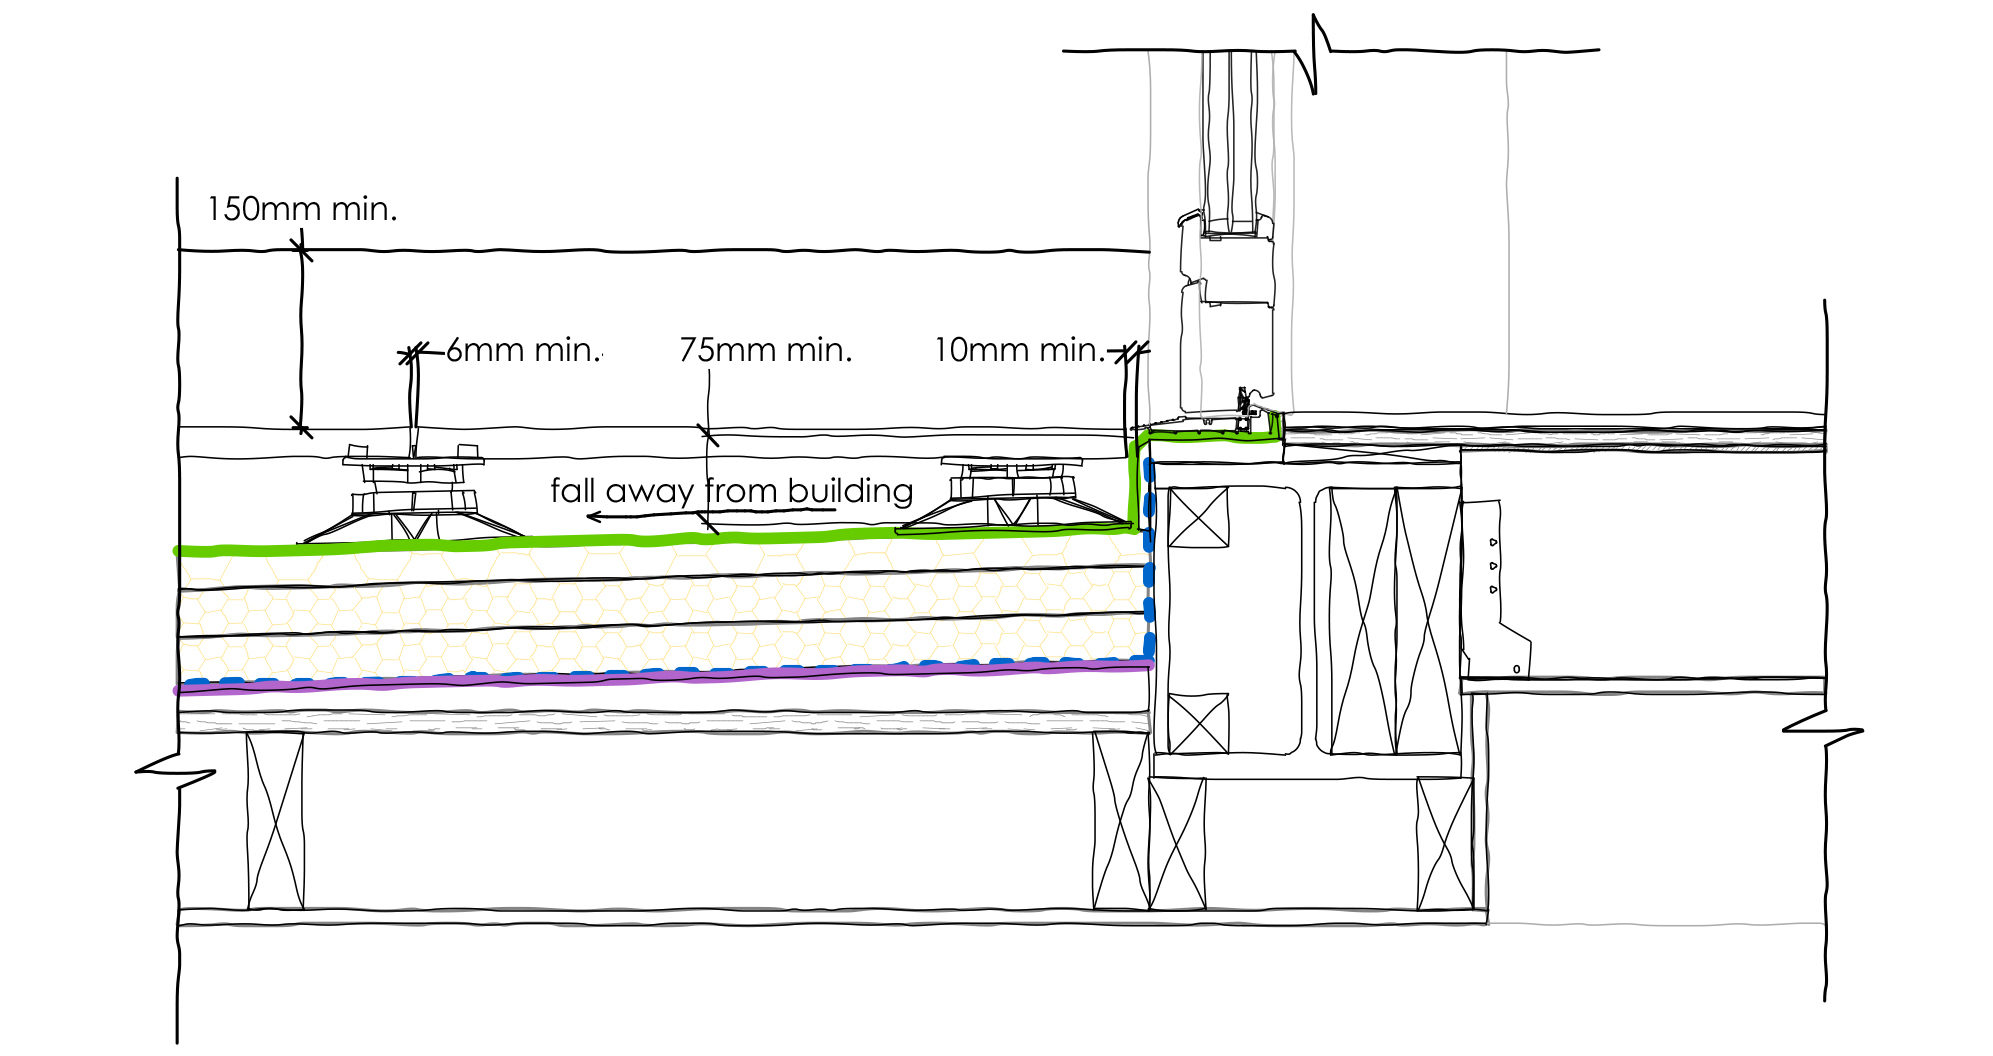 When designing a level threshold onto a raised terrace or balcony, even more care needs to be taken to assure that water does not enter the building fabric.
When creating a level threshold over a heated space, care needs to be taken when setting the internal finish floor level and ceiling level to allow for the new insulation. Many people opt for vacuum insulation to this area to allow for a reduced terrace build-up.
Adjustable pedestals can be used to bridge the gap between the level pavers or timber deck with the sloped flat roof. The gaps between the deck material is also key in allowing the water to drain through to the roof and the roof outlet.
Key Points To Remember
- The threshold including door frame should not be more than 15mm in height overall. Of these 15mm, there should be a minimum number of upstands and slopes, with any upstands higher than 5mm chamfered.
- The gap between door sill and paving or timber to be a minimum of 10mm.
- The gap between paving or timber to be a minimum of 6mm.
- Flat roof to have 1:40 falls for a 1:80 minimum built slope.
- Ensure all water falls away from the doorway in a single direction.
- Build a drainage outlet on the opposite side of the flat roof to the threshold.
- Ensure the flat roof has an overflow.
- Ensure all waterproofing has a minimum of 75mm upstand under the threshold.
- Provide a minimum 150mm waterproofing upstand to sides such as brickwork.
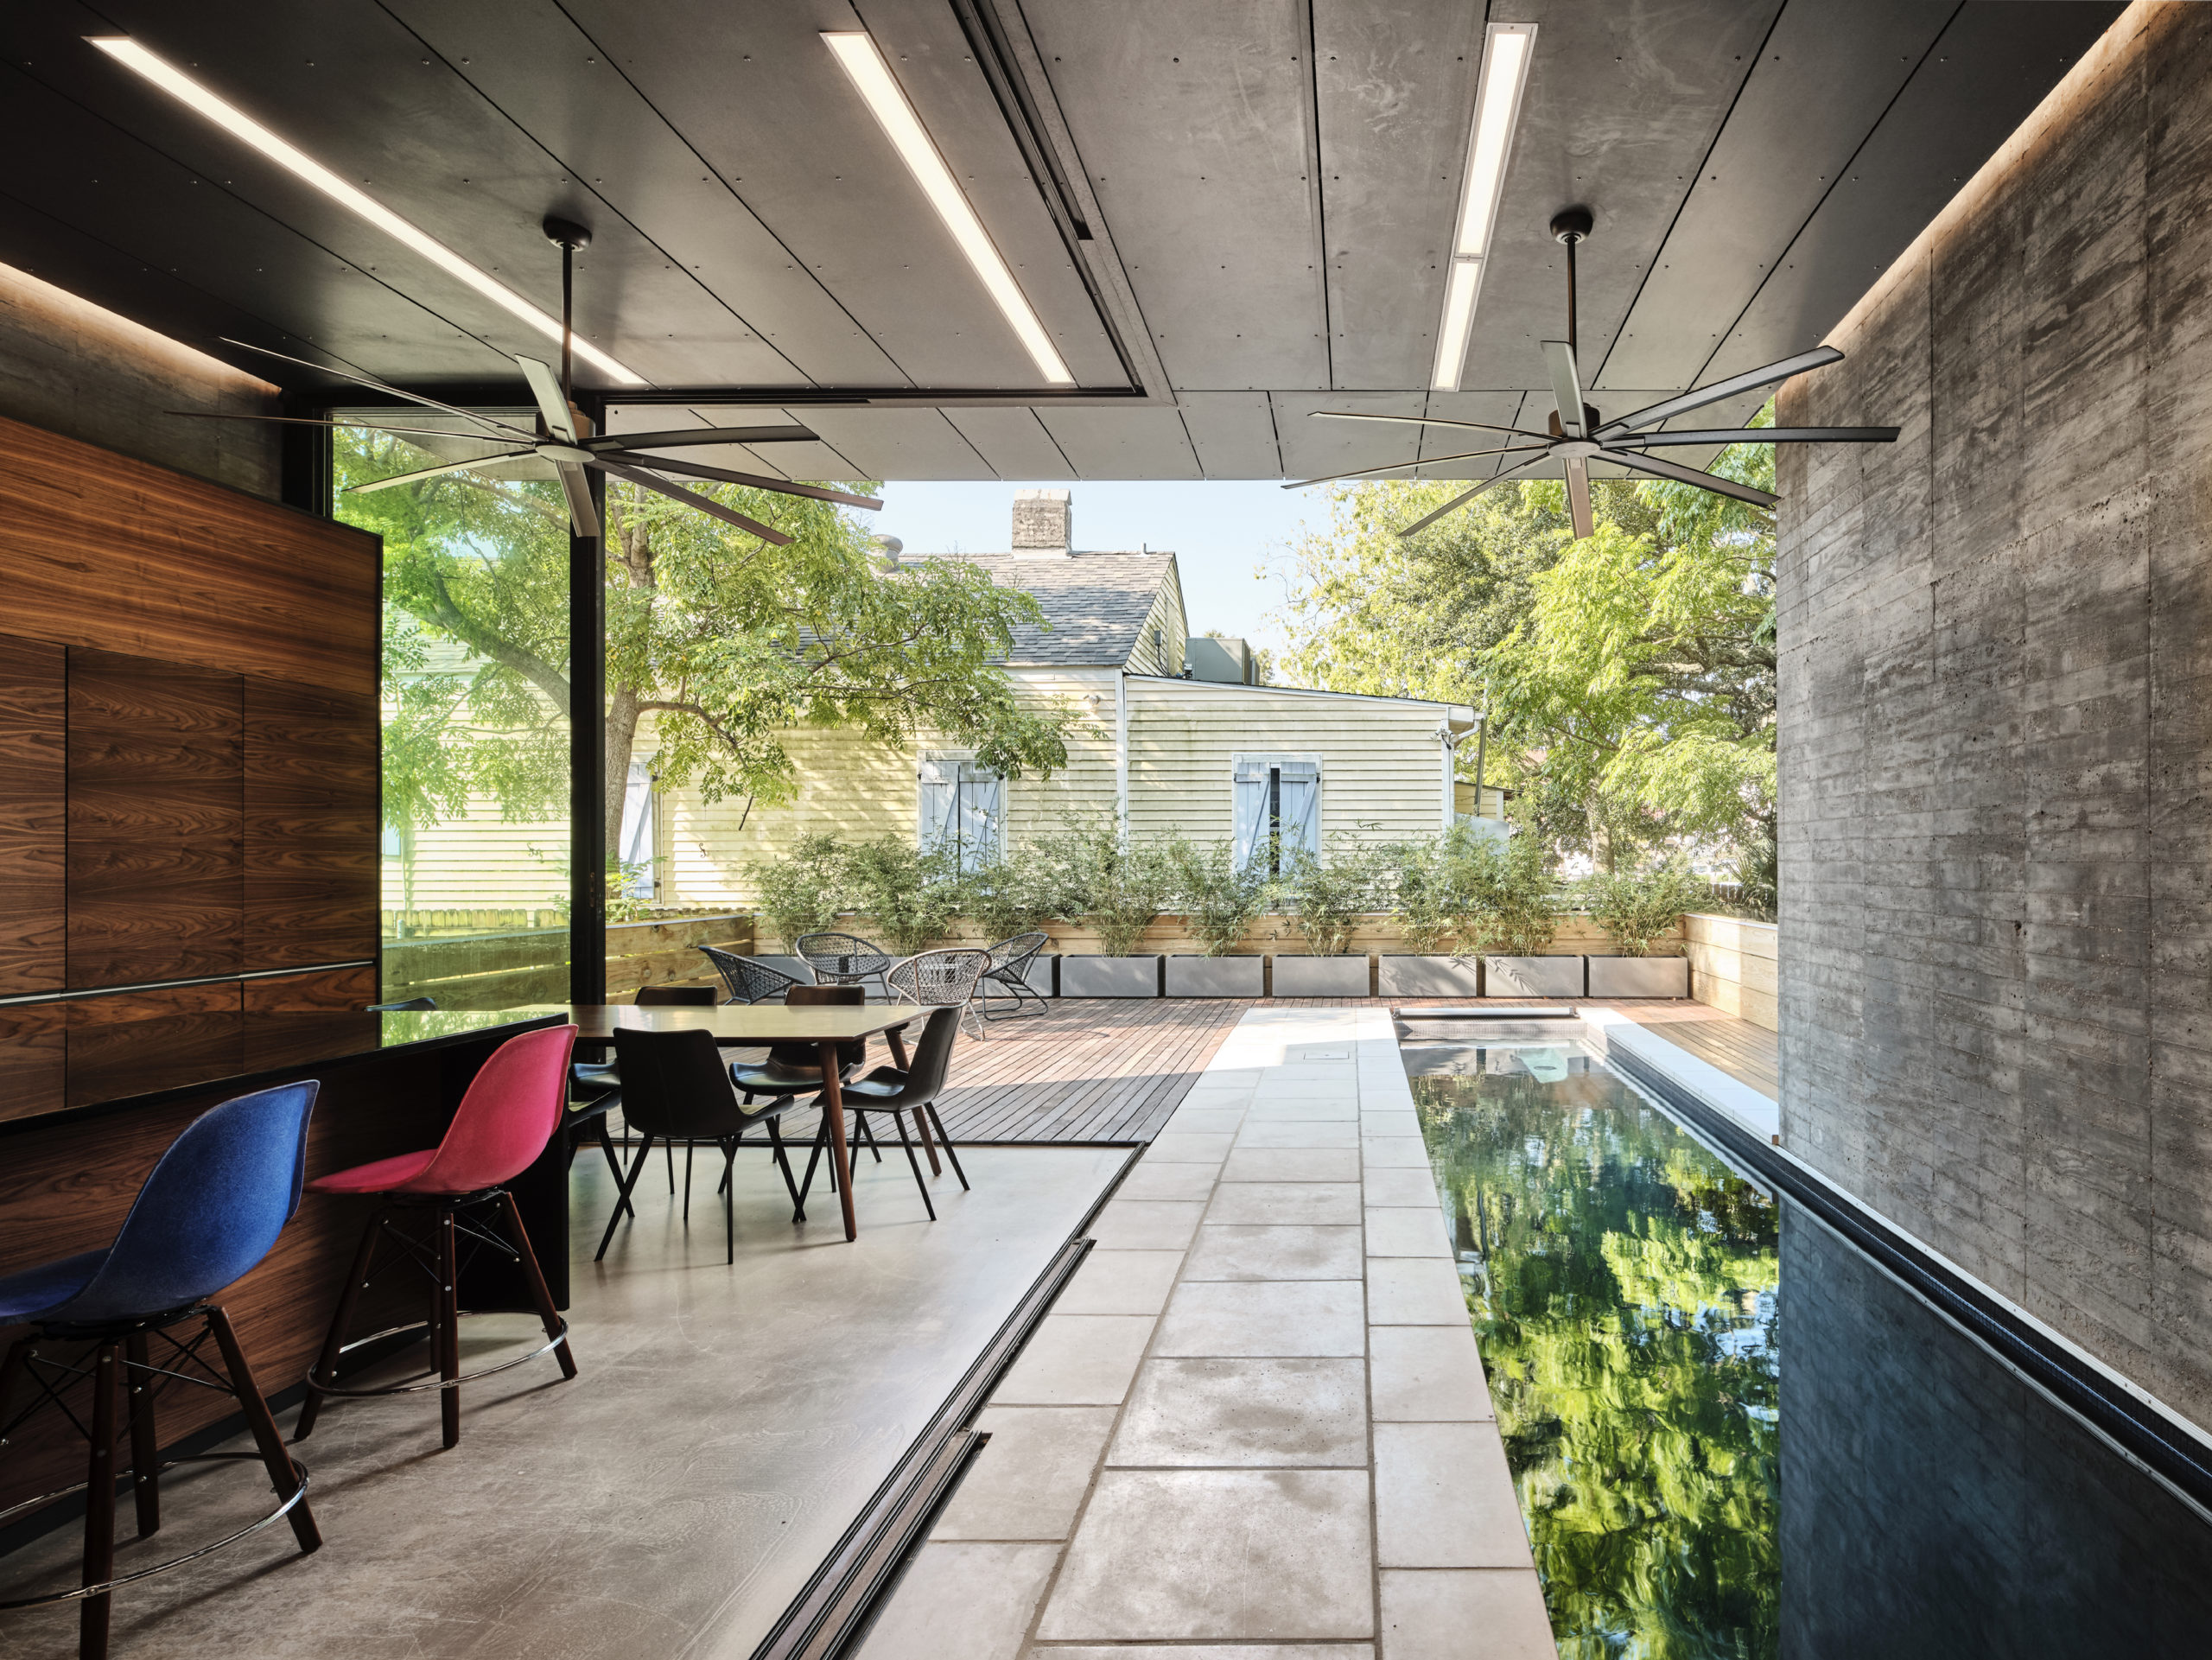
Bienville House by Nathan Fell Architecture, New Orleans, LA, United States
Resources
If you want more inspiration on level thresholds, detailing and precedents, be sure to follow Detail Library on Pinterest where we have lots of examples.
For more information on how to detail level and accessible thresholds check out the fully resolved details on The Detail Library.
Top image: Canyon Run by Migration Studios, Concept
The Fourth Annual One Drawing Challenge is open for entries! Architecture’s most popular drawing competition is back and bigger than ever, including larger prizes. Get started on your submission and hurry — the Main Entry Deadline of October 21st is fast-approaching.

