7 Tips for Snapping a Killer Architectural Photograph
CategoriesArchitecture

7 Tips for Snapping a Killer Architectural Photograph

Send us a photo. Tell us a story. Win $2,500! Architizer’s 3rd Annual One Photo Challenge is underway with a Main Entry Deadline on June 24, 2022! Start your entry for architecture’s biggest photography competition here.

The art of architectural photography is a passion not just for architects, but everyone with a desire to capture the environment around them in all its glory. This desire extends far beyond simply archiving a building’s physical features: we yearn to capture the mood, atmosphere and emotion of places and the people that inhabit them. This is what Architizer’s One Photo Challenge — our global annual competition dedicated to architectural photography — is all about.

With 2 top prizes of $2,500 and global recognition for your work, this is a competition you will want to get involved with. Head this way to learn more and upload your submission:

Enter the One Photo Challenge

Architizer’s popular architectural ideas competition poses a simple question: Can you capture a single photograph that tells a powerful story about architecture? The best architectural photographs can tell you more about a building or cityscape than any essay or lecture, informing and inspiring in equal measure.

But what does it take to achieve such lofty goals with your phone, a compact or even an SLR? I am no technical expert when it comes to the genre, but I have taken a few snaps in my time: 10,000 photographs over 9 months of traveling in 2012 drew me so deeply into this niche, I suspect I’ll never view the built environment the same way ever again!

Here’s what I learnt over the course of that extraordinary year, primarily relating to composition and shot selection. Hopefully, one or two of these tips will aid you in your own quest for photographic immortality…
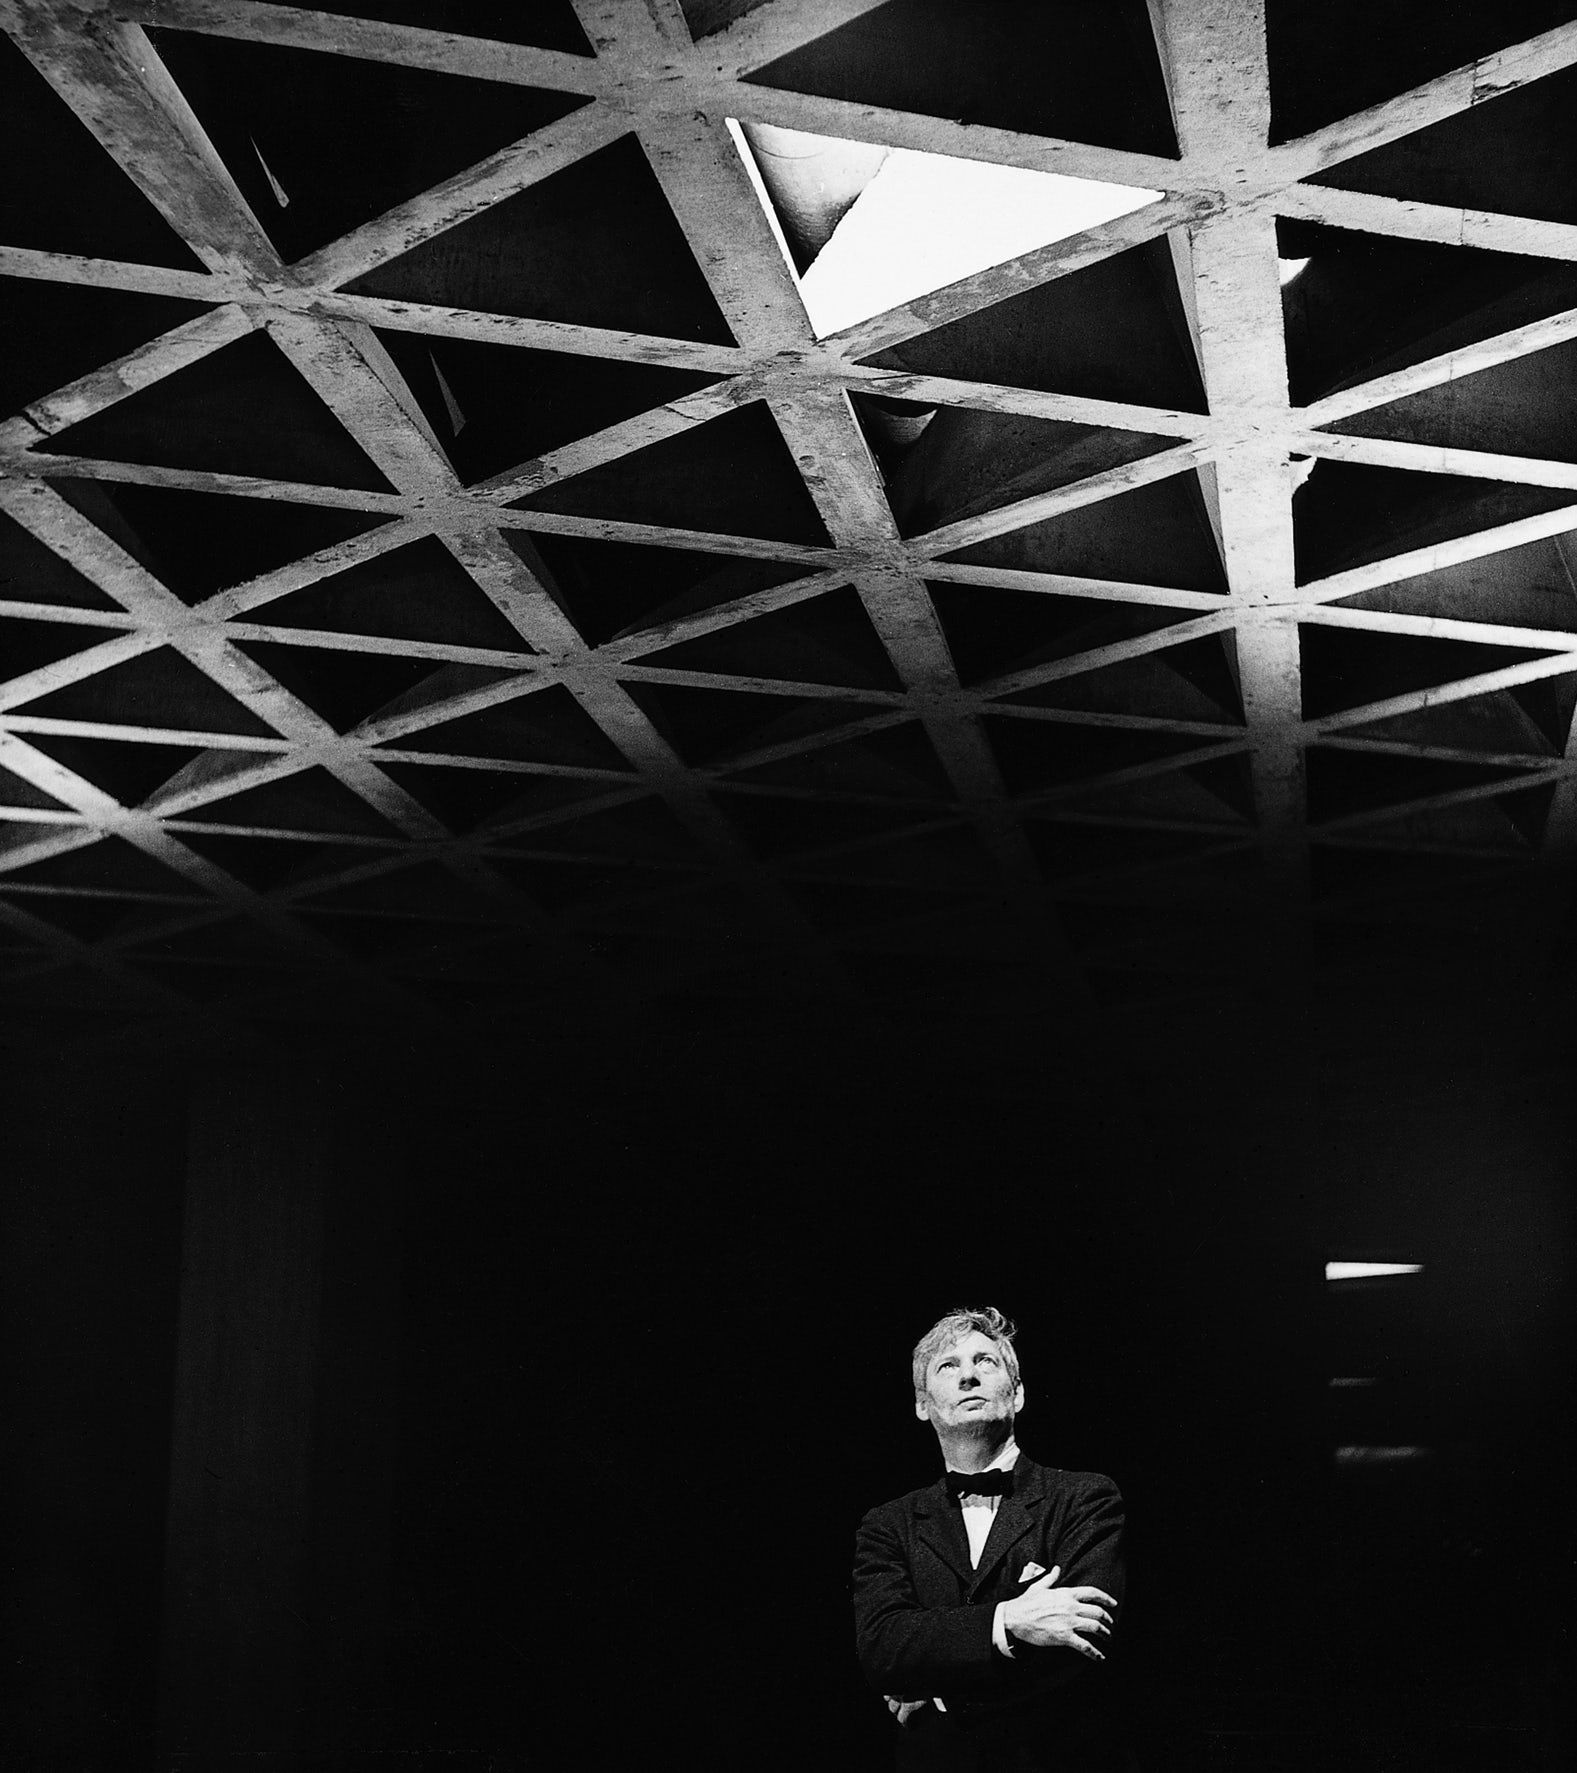
Louis Kahn Looking at His Tetrahedral Ceiling in the Yale University Art Gallery, 1953. © Lionel Freedman. Via Archdaily

1. Let There Be Light

Khan, Ando and Zumthor will tell you as much — light is the most crucial tool in an architect’s box, and the same can be said for photographers in the field. For exteriors, visit your subject in the early morning or late afternoon when the sun is low in the sky to capture images with a greater degree of contrast — assuming, of course, the weather is kind to you. I have been known to sit for an hour or more, waiting for the clouds to break so I can catch my favorite buildings at their glorious best. It pays to be patient!

Look for concentrated natural light sources within buildings too, for dramatic, high contrast shots full of atmosphere.

Centre Pompidou by Piano + Rogers.© Royal Academy of Arts. Via Metalocus

2. Color Me Stunning

Black turtleneck clichés abound, many architects would consider themselves somewhat allergic to color — there is nothing like a high-contrast monochromatic image to accentuate the striking forms and uncompromising lines of a modernist icon by Niemeyer or Corbusier.

However, it is possible — bear with me here — for a flash of color could provide a distinctive, eye-catching moment within your image, communicating architectural language by accentuating a window reveal, a soffit, or a key structural element. Try photographing the work of Richard Rogers, with his vibrant Pompidou ductwork, to kick-start your newfound love affair with color.

© Trey Ratcliff. Via PhotographyMad

3. The Rule Of Thirds

The Rule of Thirds is typically recognized as a safe bet when considering composition in photography: keep your primary subject or focal point off centre, a third of the way across the view, to creating additional tension, energy and interest within the image. For more distant shots, a composition should have balance and weight if the horizon sits a third of the way up the image.

Having said all this, if your subject lends itself to a centred composition, or a zoomed-in detail, go right ahead – rules are made to be broken!

© Ezio Beschi. Via Flickr

4. Rhyme and Rhythm

A certain Johann Wolfgang once compared architecture to frozen music, and you can see his point: Some of the greatest works in our time have some wonderful rhythmic qualities. If you can find the right angle from which to take your photograph, these rhythms can be emphasized, revealing the logic behind the designer’s thinking and the structural qualities of the building in a single, stunning image.

Once you have those repeated elements within your viewfinder, align diagonal lines of perspective with the corners of the photograph to add depth and balance in equal measure.

Hong Kong High Rise. © Michael Wolf. Via Daily Mail

5. Clean vs. Chaotic

A classic architectural cliché is illustrated in that most infamous of Tumblrs, ‘Unhappy Hipsters’: Clean-cut minimalism, free from even the slightest speck of dust, a children’s toy, or — heaven forbid — a smiling face. However, consider shooting buildings in all their ugly glory: Anarchic apartment blocks, traffic-filled streetscapes and rusting industrial monoliths can tell a story that your slick, set-piece image may never manage.

The same can be said for weather: Capturing your favorite architectural icon on a crisp, clear day is just fine, but what about shooting it during the chaos of a thunderstorm, or even a blizzard? Brave the elements and find out, hardy souls.

‘Break Point’. © Darell Godliman. ViaBD Online

‘The Urban Lantern’. Via BD Online

6. The Human Touch

Speaking of smiling faces, who needs ’em? I have spent many a long day waiting with growing frustration as people walk in front of the church or museum elevation I’m trying to catch a perfect, person-free image of. We are all about the architecture, not the portraiture… right?

Ok, I must grudgingly admit that sometimes people can add an awful lot to your photograph. From a practical point of view, they provide comparable scale — tiny people in front of gargantuan skyscrapers really throw the urban environment into sharp perspective. On top of this, they can also provide that vital injection of cultural and social context — after all, without their inhabitants, buildings are merely objects upon the plains.

© Scott Fillmer

© Scott Fillmer

Via Craft Hubs

7. All the Gear, No Idea

If you search around the internet for architectural photography guides, you will be swamped with a plethora of recommendations regarding equipment and specifications: wide-angle lenses, tripods, tilt-shift lenses, polarising filters, bellows for detail shots, long exposures for night scenes, varied apertures… the list goes on.

If you are just starting out, reading about all of this can be bewildering – but ultimately, the best way to learn is to get out there and experiment. You will soon learn how the gear works and which settings will give you the result you are looking for.

Right, I’m off to the dark room, excuse me…


Submit your best architectural photo in the inaugural One Photo Challenge for shot at $2,500 and global recognition:

Enter the One Photo Challenge

Top Image: 56 Leonard Street by Herzog & de Meuron, photographed by One Photo Challenge juror Paul Clemence.


Reference

Architectural Building Blocks: 5 AutoCAD Tips and Tricks
CategoriesArchitecture

Architectural Building Blocks: 5 AutoCAD Tips and Tricks

ArchiHacks is an online resource for architects dedicated to architecture visualization, portfolio, and design tips and tricks for students and professionals. This article was written by team member Tommy Minh Nguyen.

Not everyone may have the chance to use AutoCAD, but sooner or later, you will probably end up using some form of computer-aided drafting (CAD), which will have a similar workflow. AutoCAD was developed and marketed by Autodesk for architects, engineers, and construction professionals to create precise 2D and 3D drawings. The strides in architecture technologies in recent years catapulted the design and construction of amazing projects. For many emerging professionals, AutoCAD isn’t on the radar anymore (even if they are entering the workforce with extensive knowledge of new software). Yet, even if everyone talks about Revit, Grasshopper, Rhino, and all the sorts of BIM or 3D modeling software, AutoCAD is still utilized in firms all across the world.

If you aren’t familiar with or used AutoCAD much, it’s okay — we will be sharing five tips that will facilitate a quicker workflow of the industry’s staple that is still around! Besides, being familiar with AutoCAD can establish a good foundation for other programs. It’s important to note that the images below are stitched to illustrate the process better, so it will not look the same when attempting this.

Shortcuts + Customization

One of the greatest hacks for any software is learning the shortcuts. This may not be news, but what if I said you could customize the shortcuts in AutoCAD even further? I recently learned this trick and thought, ‘Had I known this sooner, I would have saved so much time.’

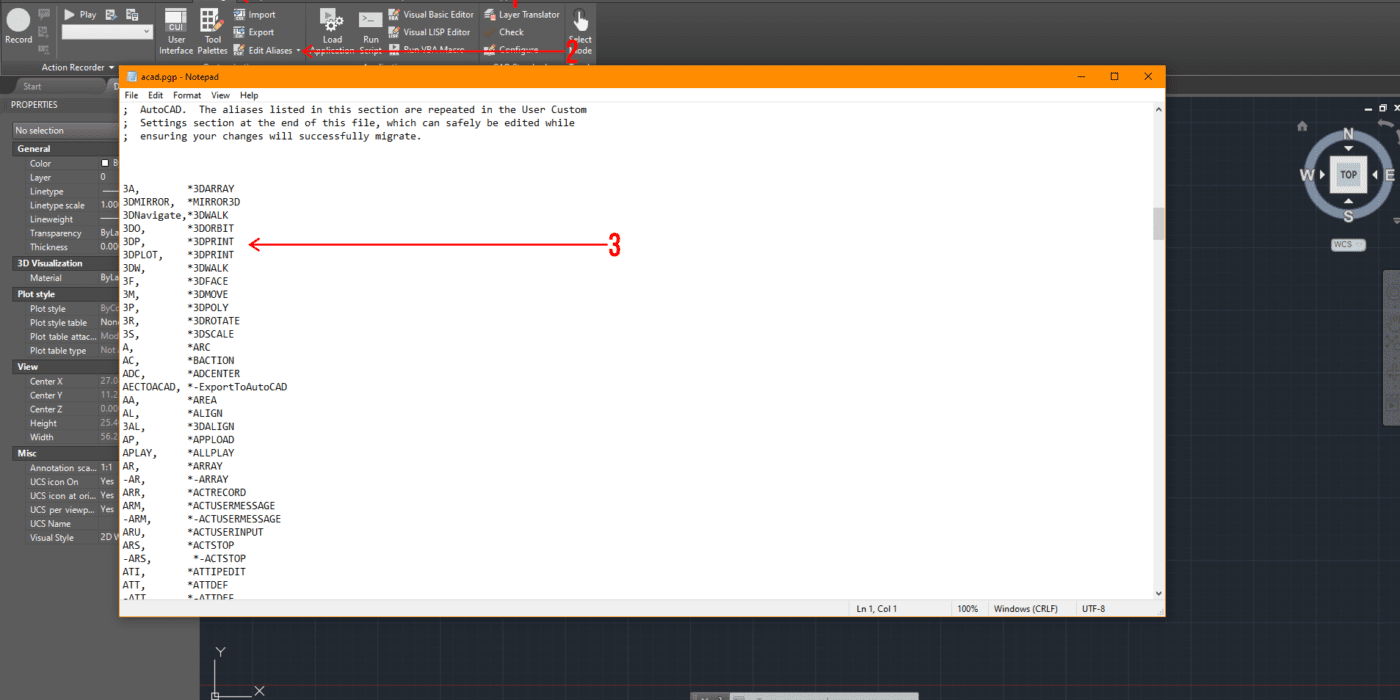
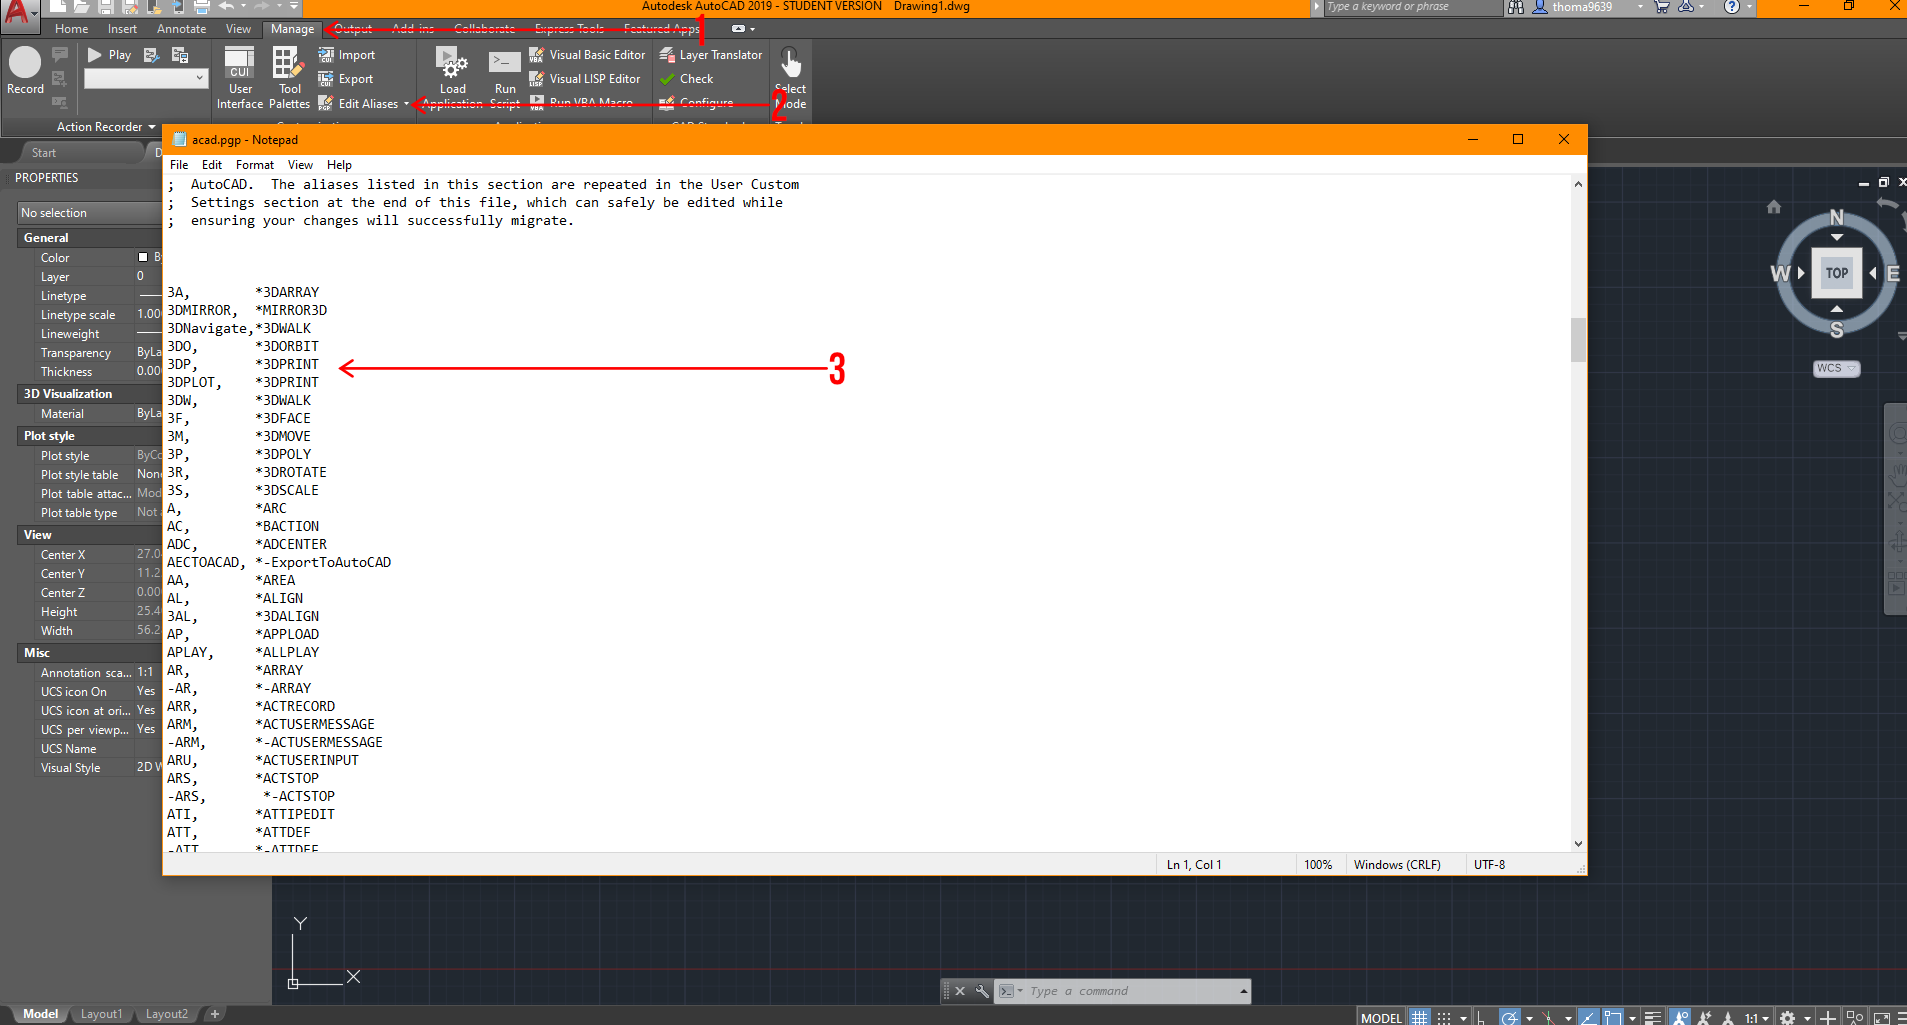
How do you set up your own shortcuts? When you open up AutoCAD, you’ll want to click on the “Manage” tab, then click on “Edit Aliases,” and this window should pop up.

From here, you can customize all the shortcuts you need to one or a few keys to do multiple tasks. It’s important to make sure there are no duplicates in this notepad, or AutoCAD will be confused about what you are attempting to achieve.
Interface Customization

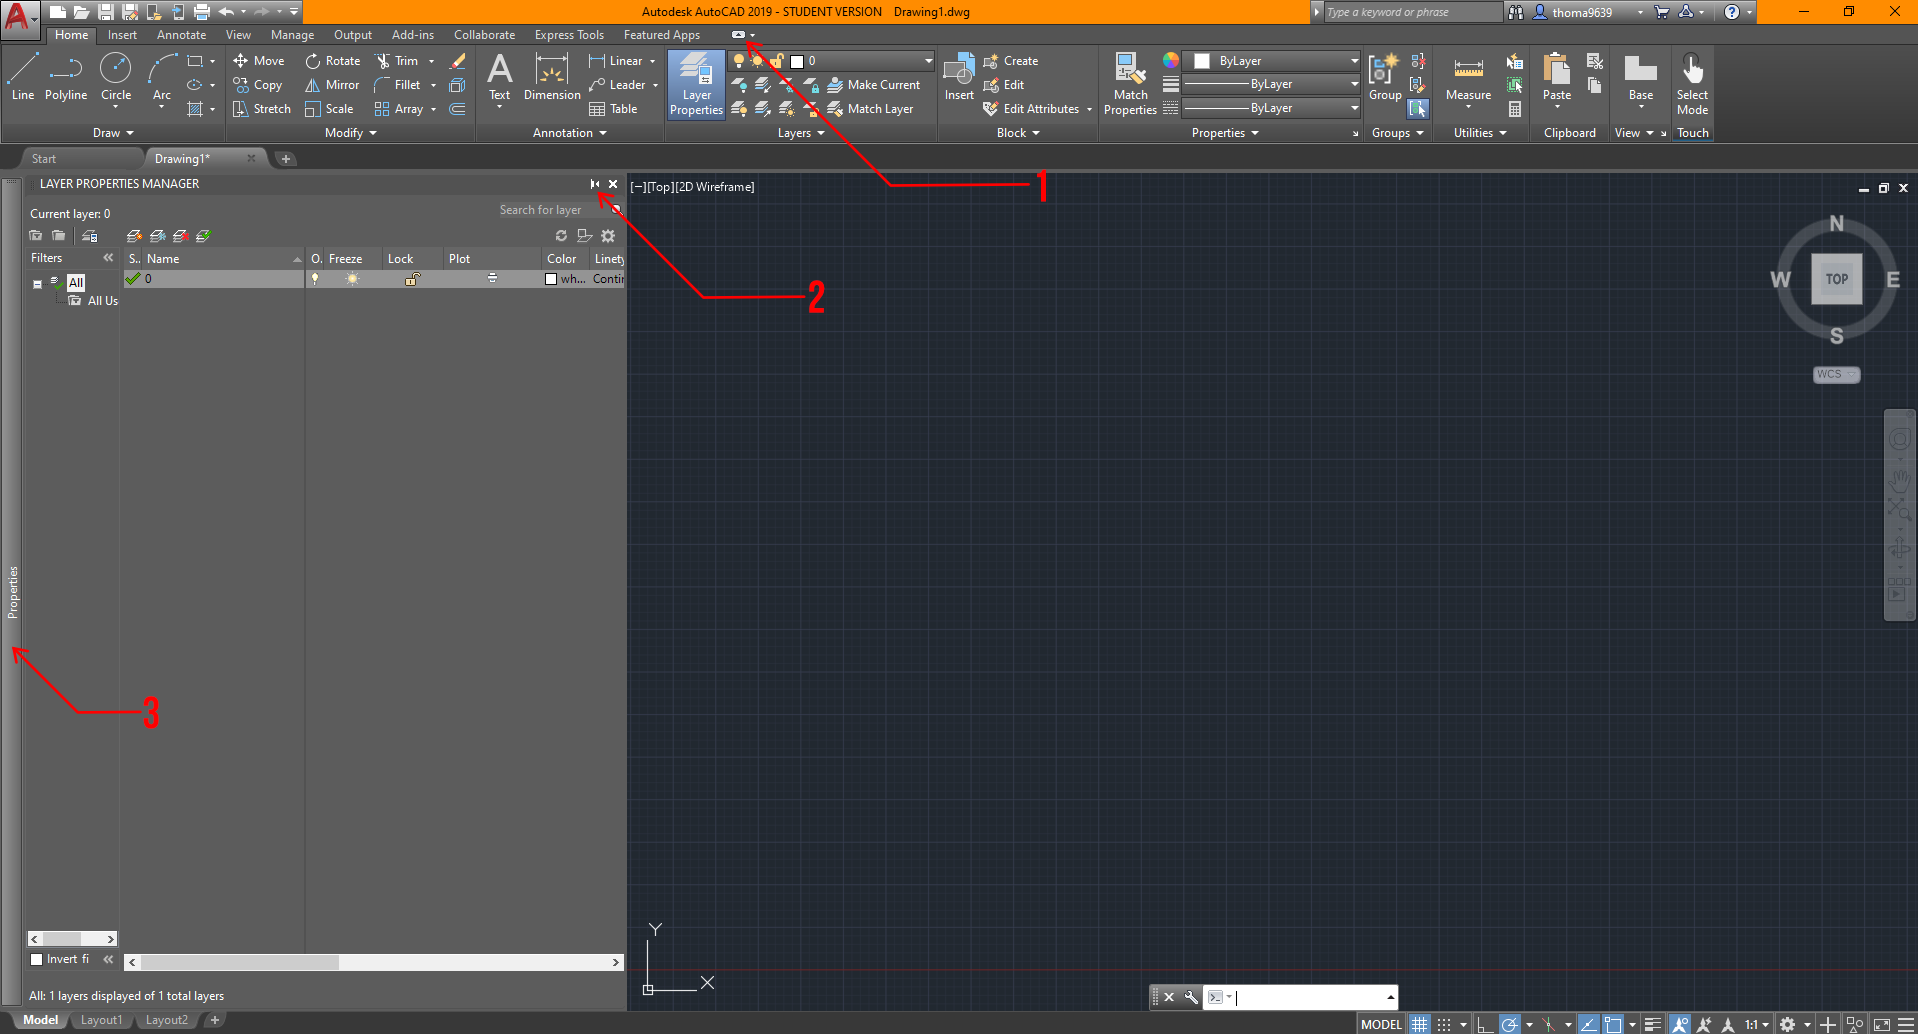
Just like shortcut customization, interface customization is the next best thing to get situated with. When I’m opening a new software, the first thing I always ask is “How do I switch this to black or dark scheme?” Luckily, it’s effortless. Type “Settings” in the command bar, and a window will pop up, which will give you multiple options to adjust the display, drafting, or user preferences settings. Take the time to explore those options and adjust to your liking! In addition, there are other ways to customize your interface, and I’ll break down some things in the image below,

  1. This button controls the ribbon area, and you can cycle through multiple settings depending on how you like it. I normally go with the ribbon option shown in the image because it’s easier to navigate than the others.
  2. This option is available for most pop-up tabs that occur in AutoCAD. This symbol essentially asks if you’d like this window to be added to your sidebar. It also toggles whether you want the tool window to stay locked or hidden when not used.
  3. The sidebar is where you’d find any anchored tool window you’d like. I usually keep my properties tab locked but place my “Layer Properties” and “External References” anchored and automatically withdrawn if not used to the side for quick access.

Utilizing Blocks

Looking back, I realized how much time I wasted without using blocks. Instead of repeatedly deleting and copying objects, I could have made changes to one block and it will change all of them in AutoCAD! Blocks essentially allow you to edit multiple instances of the same block at once.

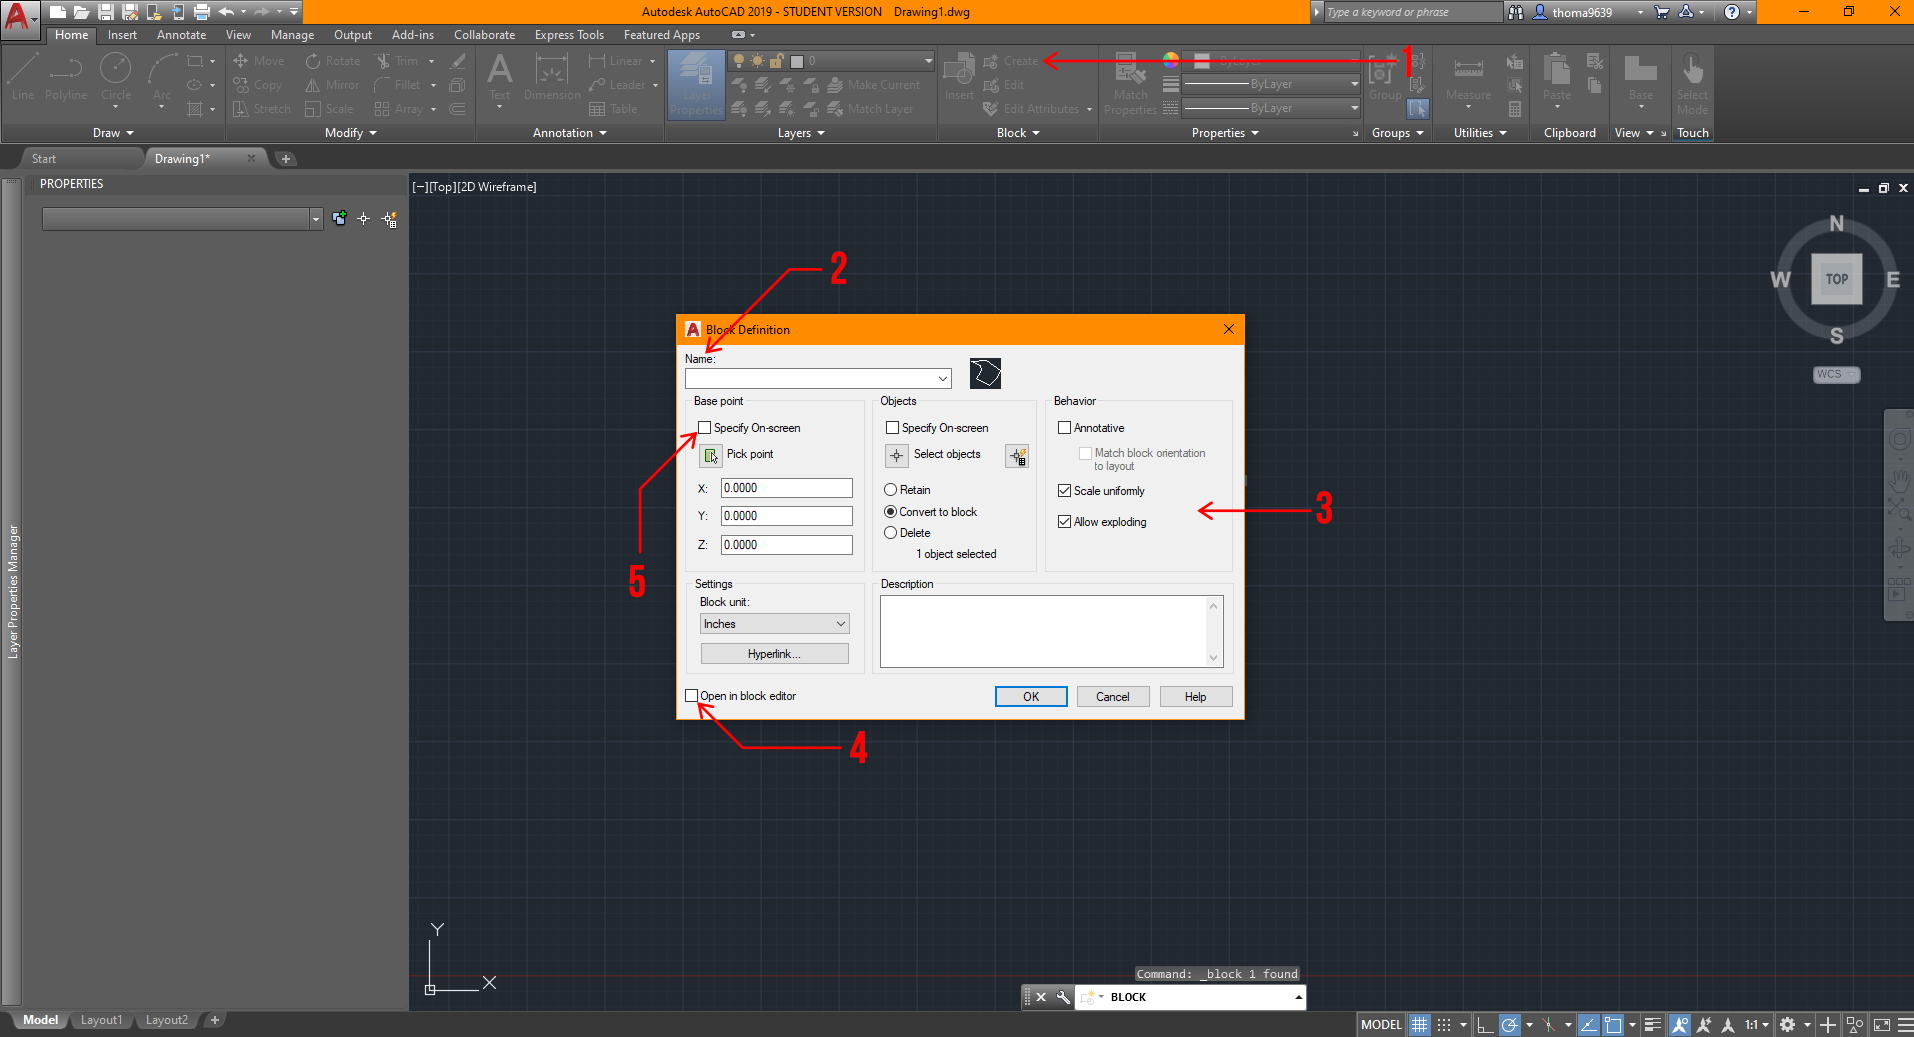
There are two effortless ways to access it: option 1 is found under the “Home” ribbon, where you can go over to the block tab to create or insert any blocks. Option 2 is housed under the “Insert” ribbon — there’s a bigger block tab that can help you learn what the image stands for, but either option will get you to the same result. Ideally, you’d want to create the object first using any tools under the option and modify tab. Once you’ve done that, select the lines, then click the “Create Block” button and this window should pop up.

You can choose to select the object after, but I find it easier and quicker to select the lines or objects first before creating the block.
  1. Click this button for the “Block Definition” window to pop up after selecting the lines and/or objects for the block.
  2. This is where you should name the block so it will save you time finding it!
  3. These are some settings you’d want to adjust eventually; for your sake, the settings shown will be ideal before adjustments.
  4. It’s ideal to uncheck this box because it’s unnecessary to edit the block right away if you’ve drawn it correctly beforehand. Don’t worry, you can always edit the block by right-clicking the object and finding the “Edit Block” option.
  5. Make sure to select this option to set the base point of the block. Otherwise, it may cause complications later on!

Utilizing xRefs or xReferences

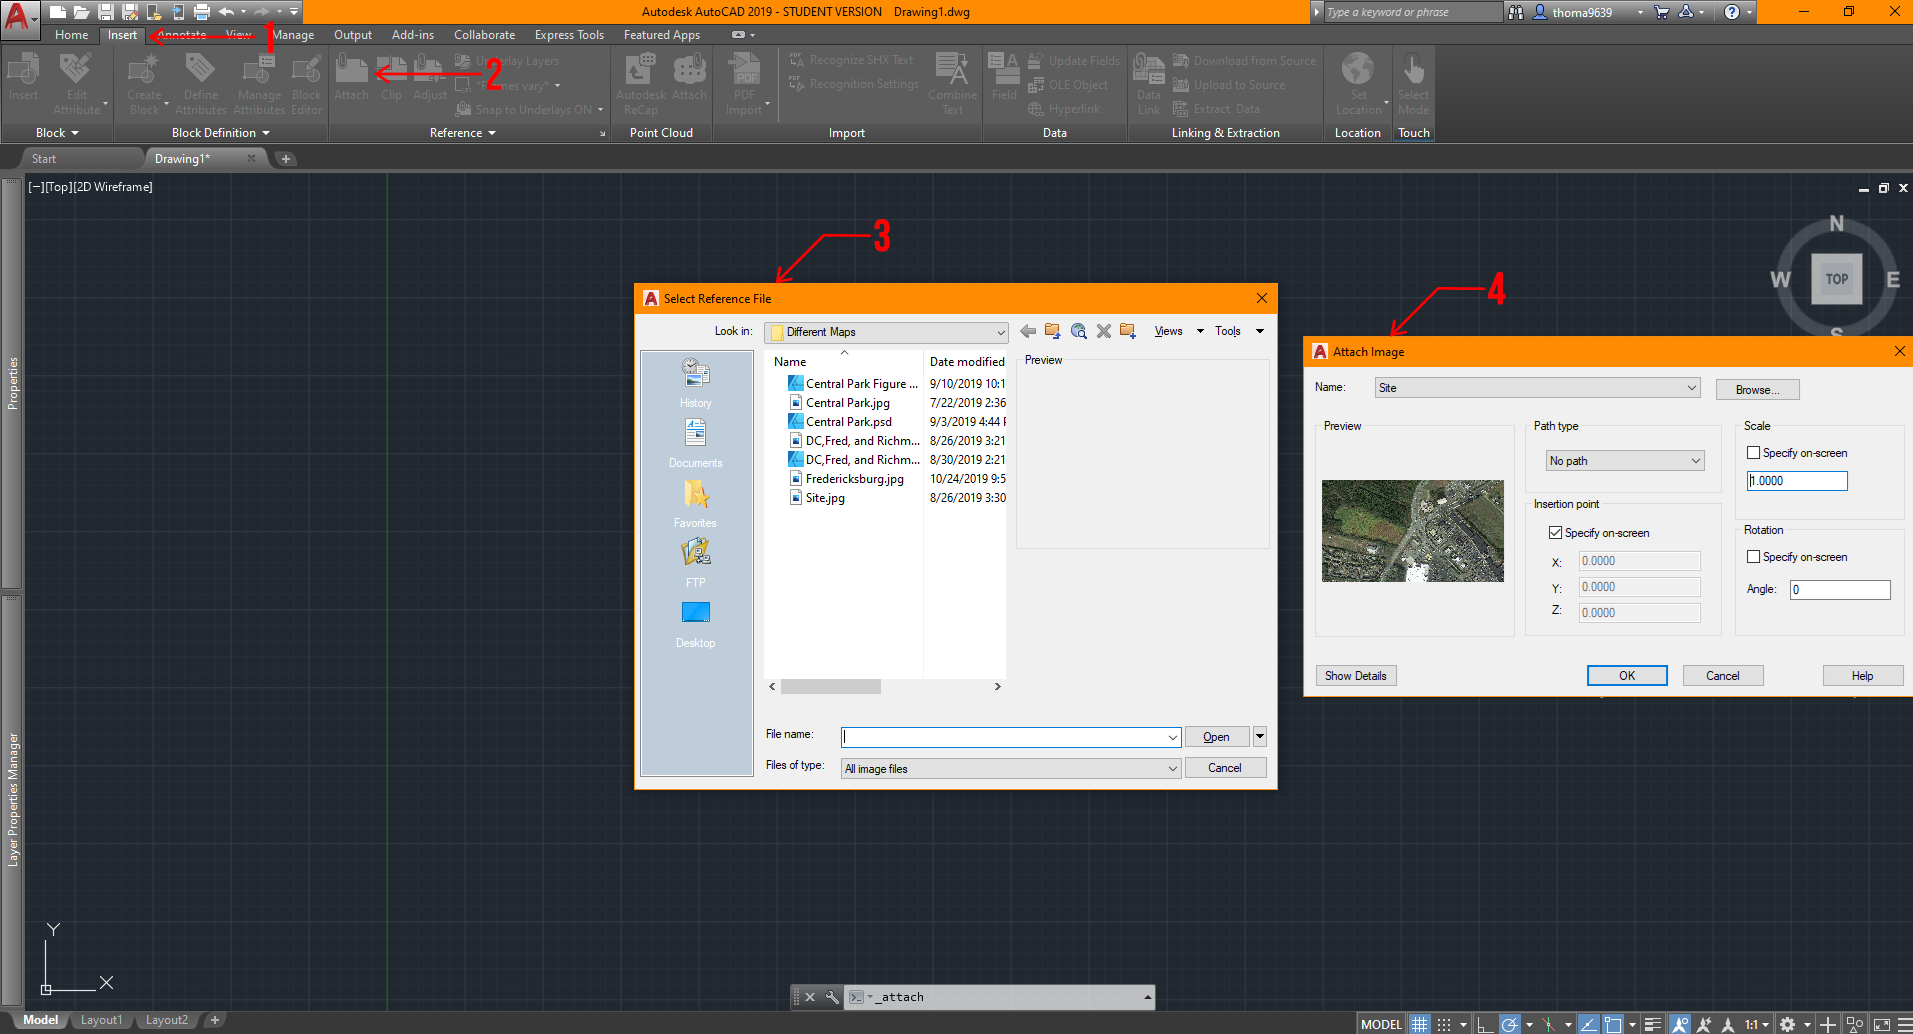
Another great hack in AutoCAD is learning how to operate xRefs; they are essentially any viable file that can be placed into the drawing to use as a reference, like PDFs, JPGs, or other AutoCAD files (DWGs). This could be extremely helpful if you were making an addition to other projects, or your project has specific site conditions you’d want to display.

This is also great practice in professional settings for several reasons. First, it allows multiple people to work on different files and still reference each others’ work. Second, it keeps each file clutter-free, lightweight, and focused on the relevant parts of the project. Third, it allows you to swap out versions or iterations by replacing xRefs quickly. Here’s how you can bring one in:

  1. Click on the “Insert” ribbon.
  2. After that, go ahead and click on “Attach.”
  3. This window will pop up for you to select what file you want to use as a reference.
  4. After making your selection, a second window will pop up, and I have already set general settings for your convenience. You could make more adjustments to these settings once you have learned the process!

Sheet Layout + Viewport Control

Let’s say you want to export a drawing without certain features but don’t want to waste time to recreate it or copy multiple views causing your file to slow down. What do you do? Sheets and viewport control are your best friend! Now, I never really used this feature until I began working, but still, I’m sure it will save you some time too! Assuming that you have a drawing in AutoCAD and it’s situated near the origin (0,0) in the model space, here are the steps you can do to maximize your efficiency in exporting views.

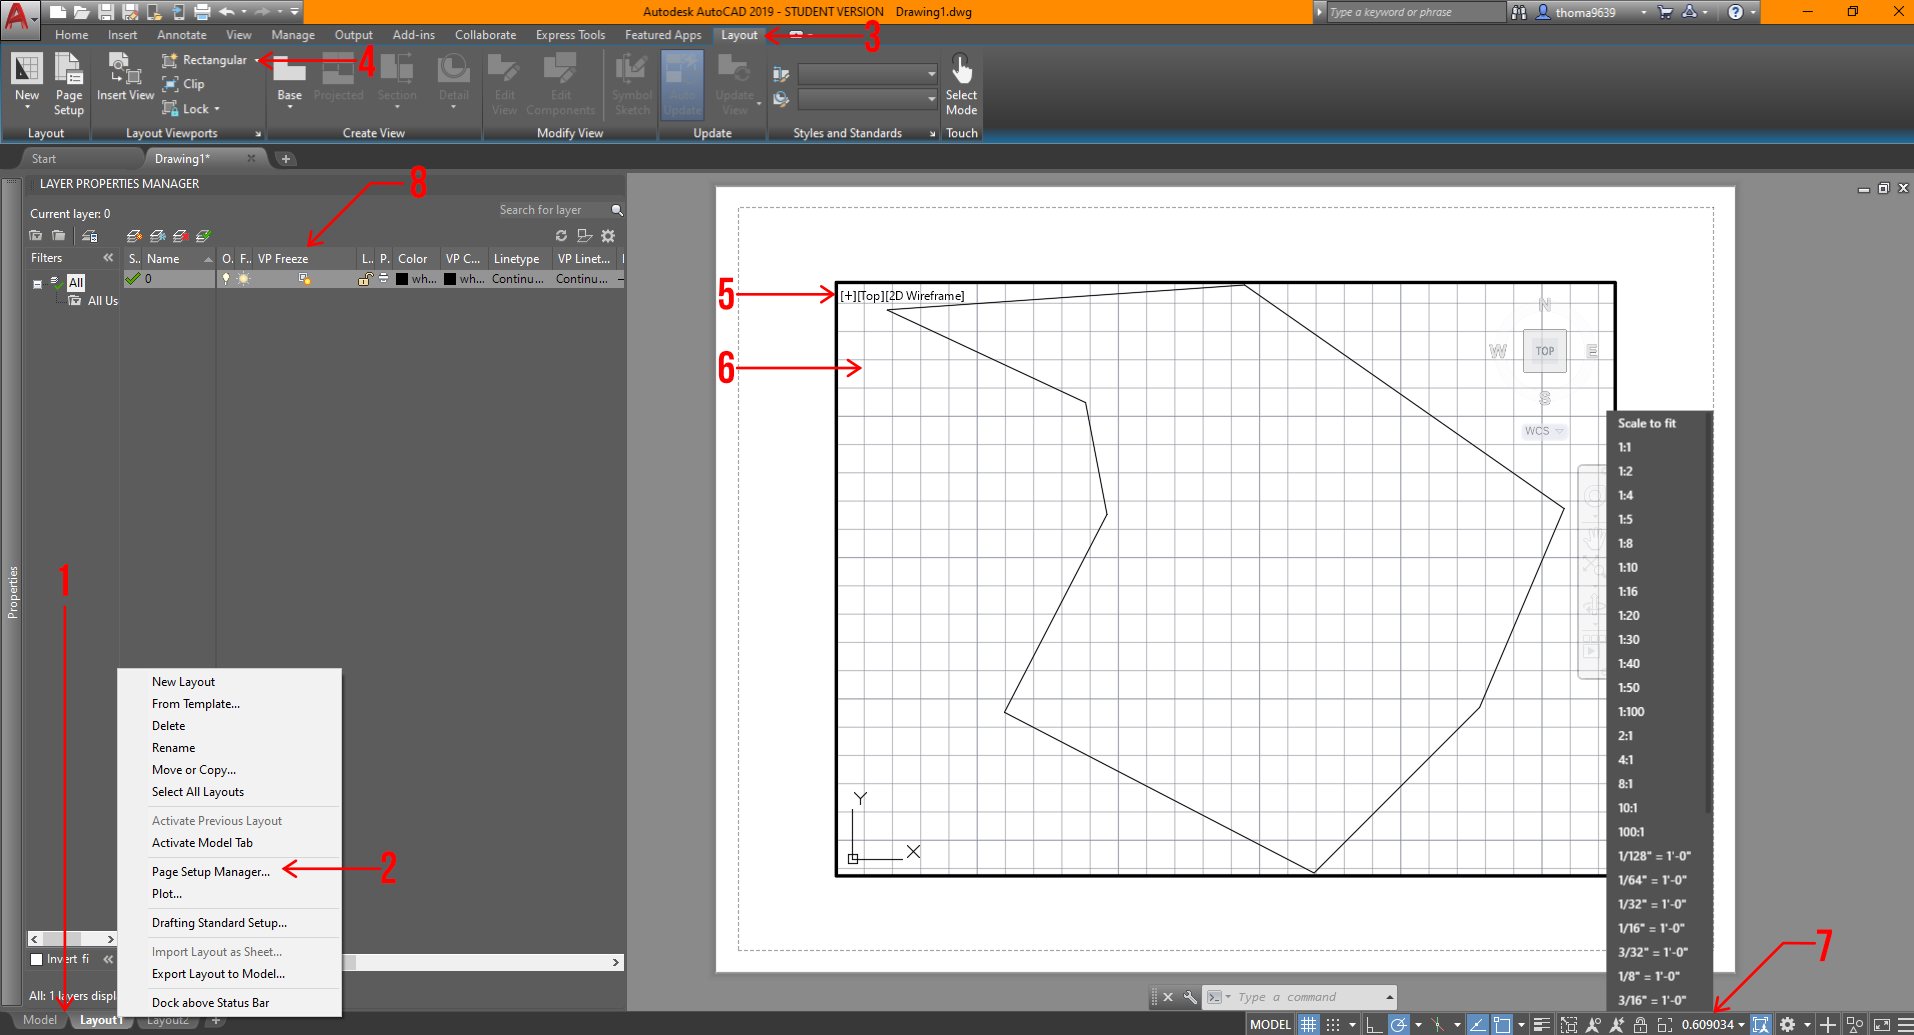
  1. In AutoCAD, the space you work in is called the “Model” space, so if you want to control your sheets for drawings and views, you will want to click on the tabs below to set that up. You can add sheets by hitting the “+” sign or right-click on a tab to add a sheet.
  2. You should confirm the sheet size or settings you will want to export the drawing in by right-clicking the sheet tabs and clicking the “Page Setup Manager” option. From there, another window will open and a few more adjustments based on your needs.
  3. Select this tab to create a viewport or view on the sheet. Viewports is another way to see your drawing, imagine it’s a camera snapshot of the model space, which you can control certain settings that won’t affect the model space!
  4. To create a viewport, click on this item. Now, you can have organic-shaped viewports, but in this scenario, let’s keep it simple. Once you click on it, all you have to do is draw a rectangle that fits your sheet, and you can always adjust if needed.
  5. This is the rectangular viewport.
  6. You can double-click into the viewport and use the mouse wheel to locate what you want visible in the box. If you want to exit the viewport space, double-click on the sheet or the colored edge surrounding the drawing.
  7. After selecting the frame of the viewport, you can control the scale of the drawing by clicking on the scale symbol at the bottom right corner. Make sure to lock the view by clicking the lock symbol next to the scale symbol. This makes your viewport fixed on what you are showing.
  8. You can turn off layers in specific viewports by opening your “Layer Properties,” finding the tab that says “VP Freeze,” and clicking on the symbol with the sun. This is similar to freezing a layer, but instead of turning it off for the entire file, it will only turn it off for that view.

This is a rather advanced technique in AutoCAD, so there’s a lot of playing around with this last one. However, if you learn this sooner, especially with the iterative process of school and work, it can save you a lot of time and headaches.

These tips vary in levels of understanding of AutoCAD; nonetheless, these should help you learn the software even faster. That’s all we got for today! I hope you found this article helpful, and if you have any tips for future students, please let us know in the comments below. Make sure to follow Archi Hacks’ YouTube and Instagram for more content.

Send Us a Rendering. Tell Us a Story. Win $2,500! Architizer’s 3rd Annual One Rendering Challenge is open for entries, with a Regular Entry Deadline of March 11th, 2022Submit a rendering.


Reference