New Contracts, Net Billing, Net Revenue and More
CategoriesArchitecture

New Contracts, Net Billing, Net Revenue and More

Lior Schnabel is a Co-Managing Partner at Precise, a company that provides financial management and control services for architectural and engineering firms across the USA and Europe. This article was written and researched with Yotam Kedem, who is a partner in Precise and the head of their USA office. 

To keep up with industry trends and stay ahead of the competition, our clients love to get info on what’s been going on in the architecture and engineering sector. In order to keep them and you up to date, we decided to collect and analyze data about project statistics and performance from 50 architecture and engineering firms based in the New York Tri-State area.

Five major criteria points we analyzed to reflect the industry trend: New Contracts, Net Billing, Net Revenue, Backlog, and number of Professional Employees. The starting point was Q1 of 2019 and we used it as the ‘index’ for the rest of the survey.

Below are the results of our findings up until December 31st, 2021:

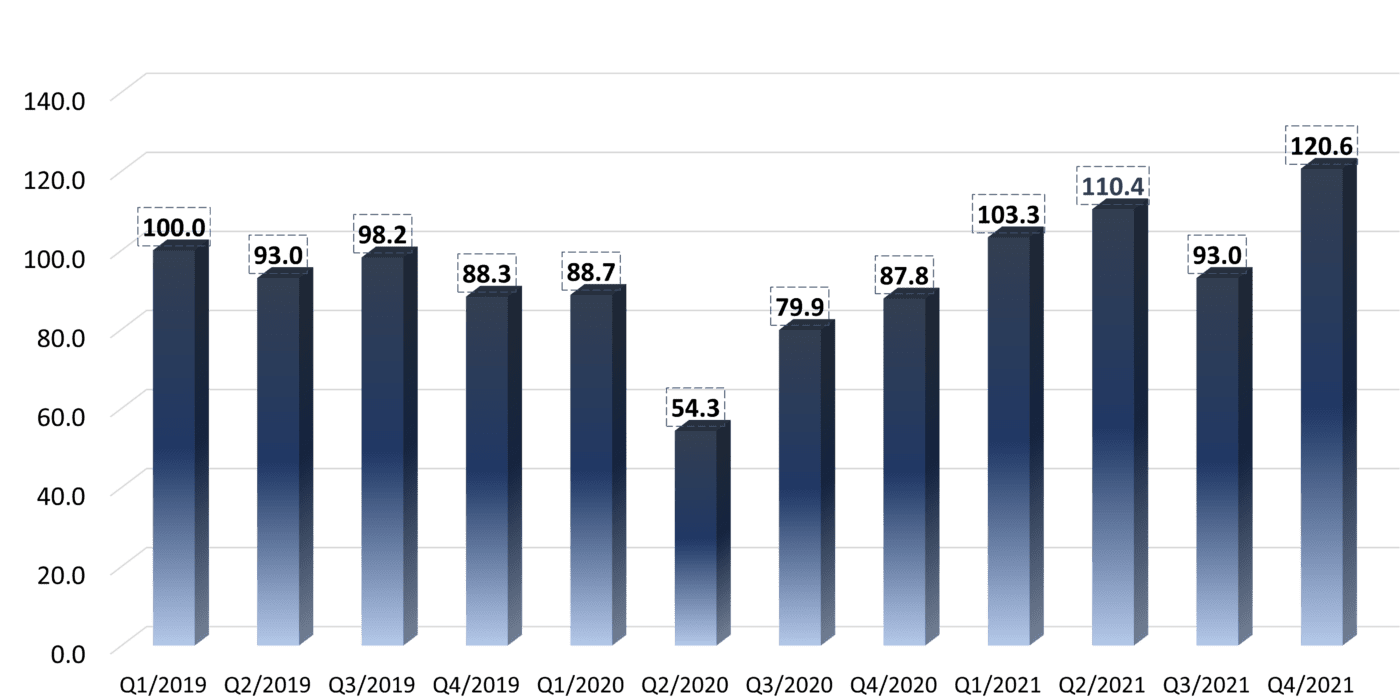
Total Amount in New Contracts represents the total value of ‘new work’ that was signed in each quarter. After a slower Q3 2021 (which can be attributed to timing more than anything else), we see Q4 2021 reaching the highest level since the beginning of the survey in Q1 2019 (120% over the index). This is a very positive indicator that reflects that the volume of projects is growing substantially.

Net Billing represents work that was invoiced and we noted an increase in every quarter from Q3 2020. During Q3 2021 and Q4 2021 invoicing was higher than the index figure for the first time since the beginning of the pandemic. This means that workload is the highest we have seen for a very long time, including the pre-Covid era.

Net Revenue represents the net cash revenue collected. Following the positive Net Billing trend, we can see a consistent increase in cash collection since Q3 2020, and by Q4 2021 billing was back to pre-Covid levels. This means firms are in a more stable place financially right now, which translates to hiring and investments in the business (such as renovations, technology, and more). It is also important to emphasize that Net Revenue figures only include revenue streams from projects/clients (and don’t include any funds such as grants or PPP).

Backlog refers to the remaining fees/balance in contracts for the active projects in the firm i.e signed work that hasn’t been billed yet. Amid a small decrease in Q3 2021 (which again is mostly timing), we can see the backlog continues to improve every quarter since the big dip in Q2 2020 (i.e., beginning of Covid). Backlog is a great indicator of workload, and Q4 2021 had  the highest backlog since the beginning of the survey. This indicates that the workload is very high right now and It’s very promising to see the backlog continuing to increase even with billing increasing as well.
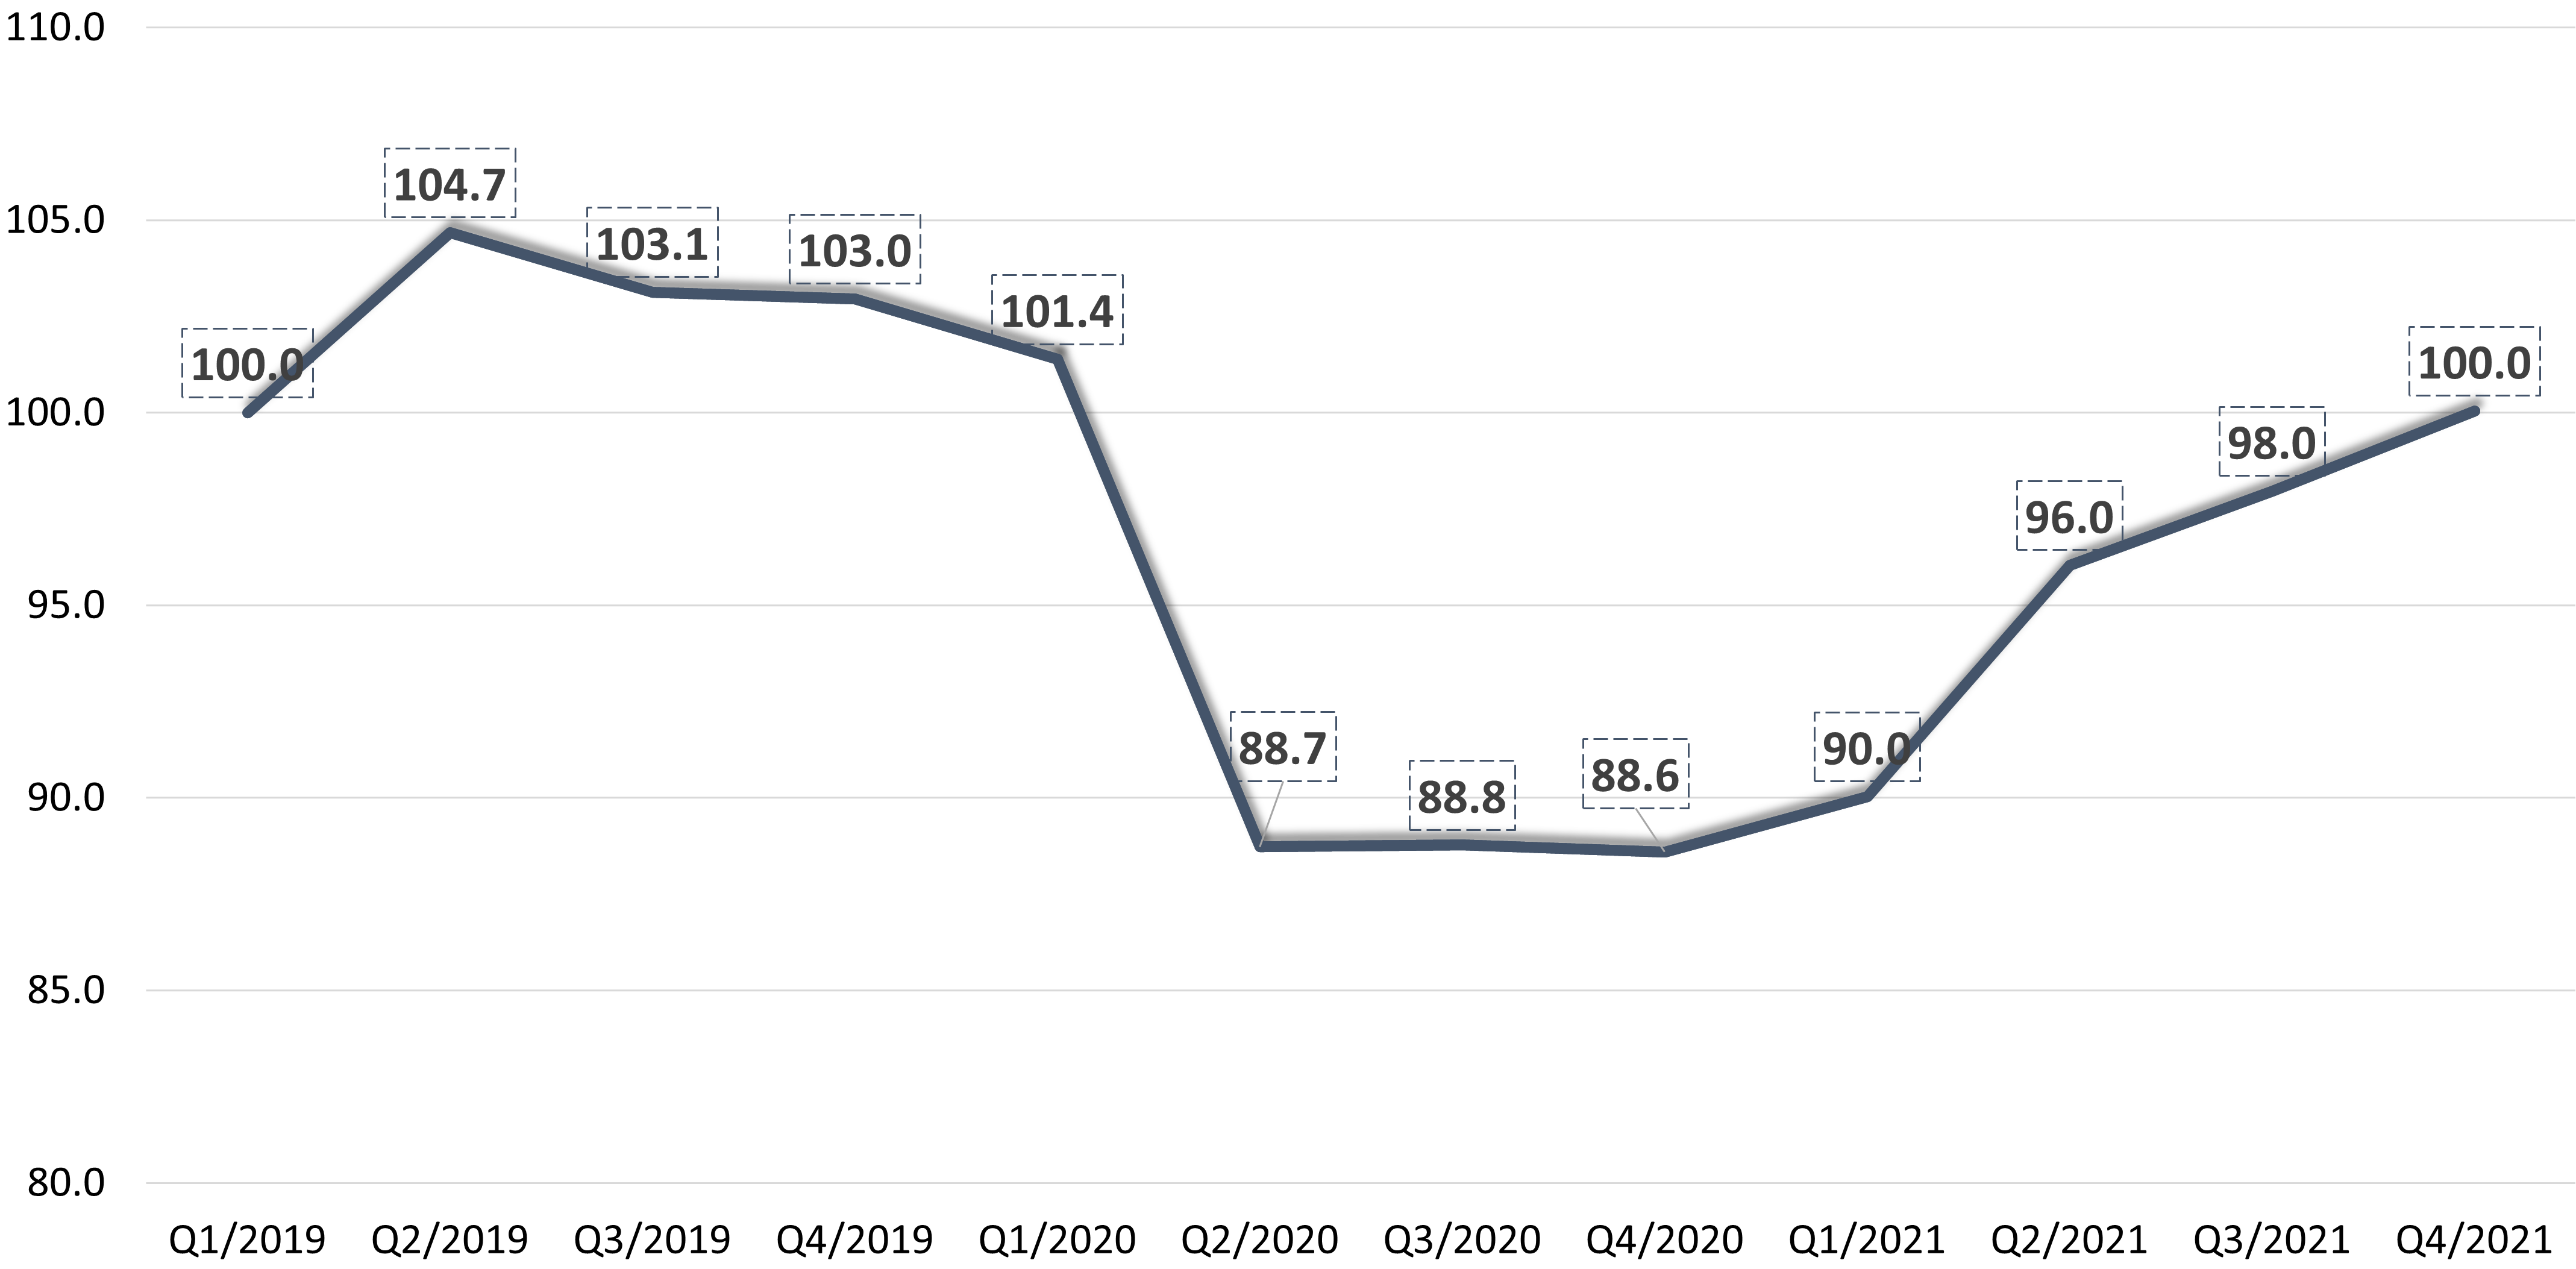
Number of Professional Employees refers to the number of technical, billable employees in the firm, (not including admin, IT, accounting or marketing staff). We are finally seeing staffing getting back to pre-Covid levels. Although the increase has been slower compared to other criteria such as backlog and billing, it still managed to get back to the index level. The increase in Professional Employees is due to the high workload in the industry  but it  lags behind because initially firms were reluctant to hire in Covid times due to the uncertainty as well as staff working remotely. Firms seem to be actively looking to hire at the moment, however it is much tougher than it used to be.

Specific Sectors

Although we can detect a high index in all criteria, the situation still varies significantly between different firms and sectors.

On the upside, the private residential sector, specifically single-family houses, has been consistently active and has continued to yield work since the early days of the pandemic and in recent months.

As for other sectors that slowed substantially during the pandemic such as housing , commercial and even public and hospitality projects, we have spotted a strong resurgence in the last two quarters.

On the downside, institutional work, such as libraries, higher education, hospitals etc., indicators are still very low.

To summarize, this is the first time since tracking started in Q1 2019 that all of the metrics reached or surpassed the index. We are pleased to see this and hope the trend will continue to progress in this positive direction or at least sustain it’s current levels. We will continue to track the numbers every quarter and report the industry trends accordingly.

Top image: The JACX by MdeAS Architects, Queens, New York, United States | Jury Winner, 2021 A+Awards, Office Building High Rise (16+ Floors)

Browse the Architizer Jobs Board and apply for architecture and design positions at some of the world’s best firms. Click here to sign up for our Jobs Newsletter.

Reference

Webinar: Learn How Real-Time Visualization Works With Enscape!
CategoriesArchitecture

Webinar: Learn How Real-Time Visualization Works With Enscape!

You’re invited! Join Architizer for an engaging live webinar presented by Roderick Bates, Head of Integrated Practice at Enscape, and learn how to successfully implement real-time visualization at every stage of design, while also creating a more inclusive design process.

Hosted by Editor in Chief Paul Keskeys, Architizer’s first webinar on architectural visualization is one not to be missed! Hit the button below to sign up for the talk, which will take place at 12pm EST on Tuesday, March 29th:

Register for Event →

BIM/CAD software often lacks a visually intuitive interface, making it too far removed from reality to understand on a level sufficient to make rapid, informed design decisions. Real-time visualization is the missing link that bridges the gap between a BIM/CAD interface and a constructed project, helping both designers and their clients to envision what a design will actually look like when built.

Decision making, BIM model quality assurance, performance analysis, and coordination all benefit from bringing real-time visualization to the BIM/CAD workflow, and Roderick will show how to do this best.

By attending this webinar, you’ll learn how to:

  • Utilize real-time visualization to increase client and stakeholder understanding of the project design at every phase
  • Leverage real-time visualization to conduct individual and collaborative BIM/CAD model quality assurance workflows
  • Identify opportunities where real-time rendering can greatly reduce the time required for critical decision making

About Roderick

Throughout his career, Roderick has sought out and developed solutions to environmental challenges related to the design, construction, and operations of buildings. As the Head of Integrated Practice at Enscape, he is responsible for researching industry and market trends which are shaping the way Enscape customers work. Leveraging that industry knowledge, Roderick collaborates with Enscape Product and R&D leaders to assess new product development opportunities that will shape the future of building design. Previously, as a Principal at Kieran Timberlake, Roderick led the efforts to develop and commercialize software and hardware tools used by the greater the AEC community to improve the environmental and operational performance of buildings.

About Paul

Paul Keskeys is Editor in Chief at Architizer. An architect-trained editor, writer and content creator, Paul graduated from UCL and the University of Edinburgh, gaining an MArch in Architectural Design with distinction. Paul has spoken about the art of architecture and storytelling at many national industry events, including AIANY, NeoCon, KBIS, the Future NOW Symposium, the Young Architect Conference and NYCxDesign. As well as hundreds of editorial publications on Architizer, Paul has also had features published in Architectural Digest, PIN—UP Magazine, Archinect, Aesthetica Magazine and PUBLIC Journal.

Register for the Talk →

Reference

Architectural Building Blocks: 5 AutoCAD Tips and Tricks
CategoriesArchitecture

Architectural Building Blocks: 5 AutoCAD Tips and Tricks

ArchiHacks is an online resource for architects dedicated to architecture visualization, portfolio, and design tips and tricks for students and professionals. This article was written by team member Tommy Minh Nguyen.

Not everyone may have the chance to use AutoCAD, but sooner or later, you will probably end up using some form of computer-aided drafting (CAD), which will have a similar workflow. AutoCAD was developed and marketed by Autodesk for architects, engineers, and construction professionals to create precise 2D and 3D drawings. The strides in architecture technologies in recent years catapulted the design and construction of amazing projects. For many emerging professionals, AutoCAD isn’t on the radar anymore (even if they are entering the workforce with extensive knowledge of new software). Yet, even if everyone talks about Revit, Grasshopper, Rhino, and all the sorts of BIM or 3D modeling software, AutoCAD is still utilized in firms all across the world.

If you aren’t familiar with or used AutoCAD much, it’s okay — we will be sharing five tips that will facilitate a quicker workflow of the industry’s staple that is still around! Besides, being familiar with AutoCAD can establish a good foundation for other programs. It’s important to note that the images below are stitched to illustrate the process better, so it will not look the same when attempting this.

Shortcuts + Customization

One of the greatest hacks for any software is learning the shortcuts. This may not be news, but what if I said you could customize the shortcuts in AutoCAD even further? I recently learned this trick and thought, ‘Had I known this sooner, I would have saved so much time.’

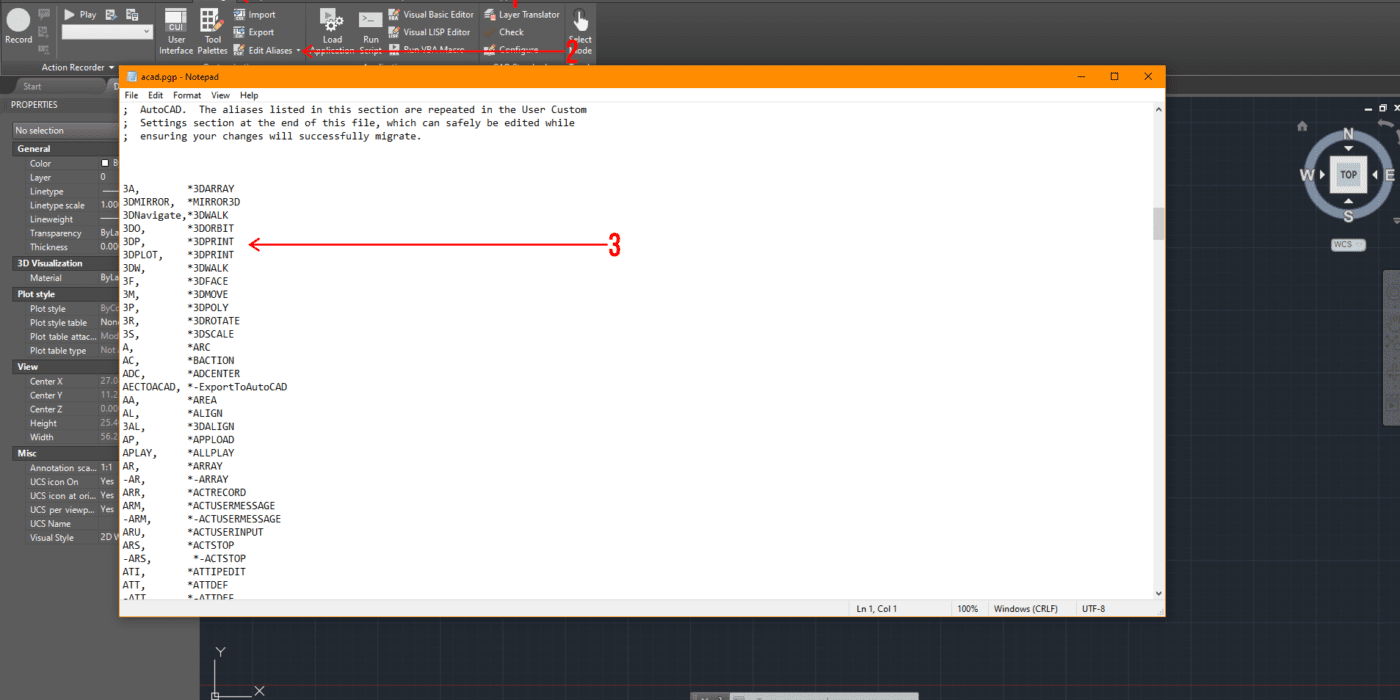
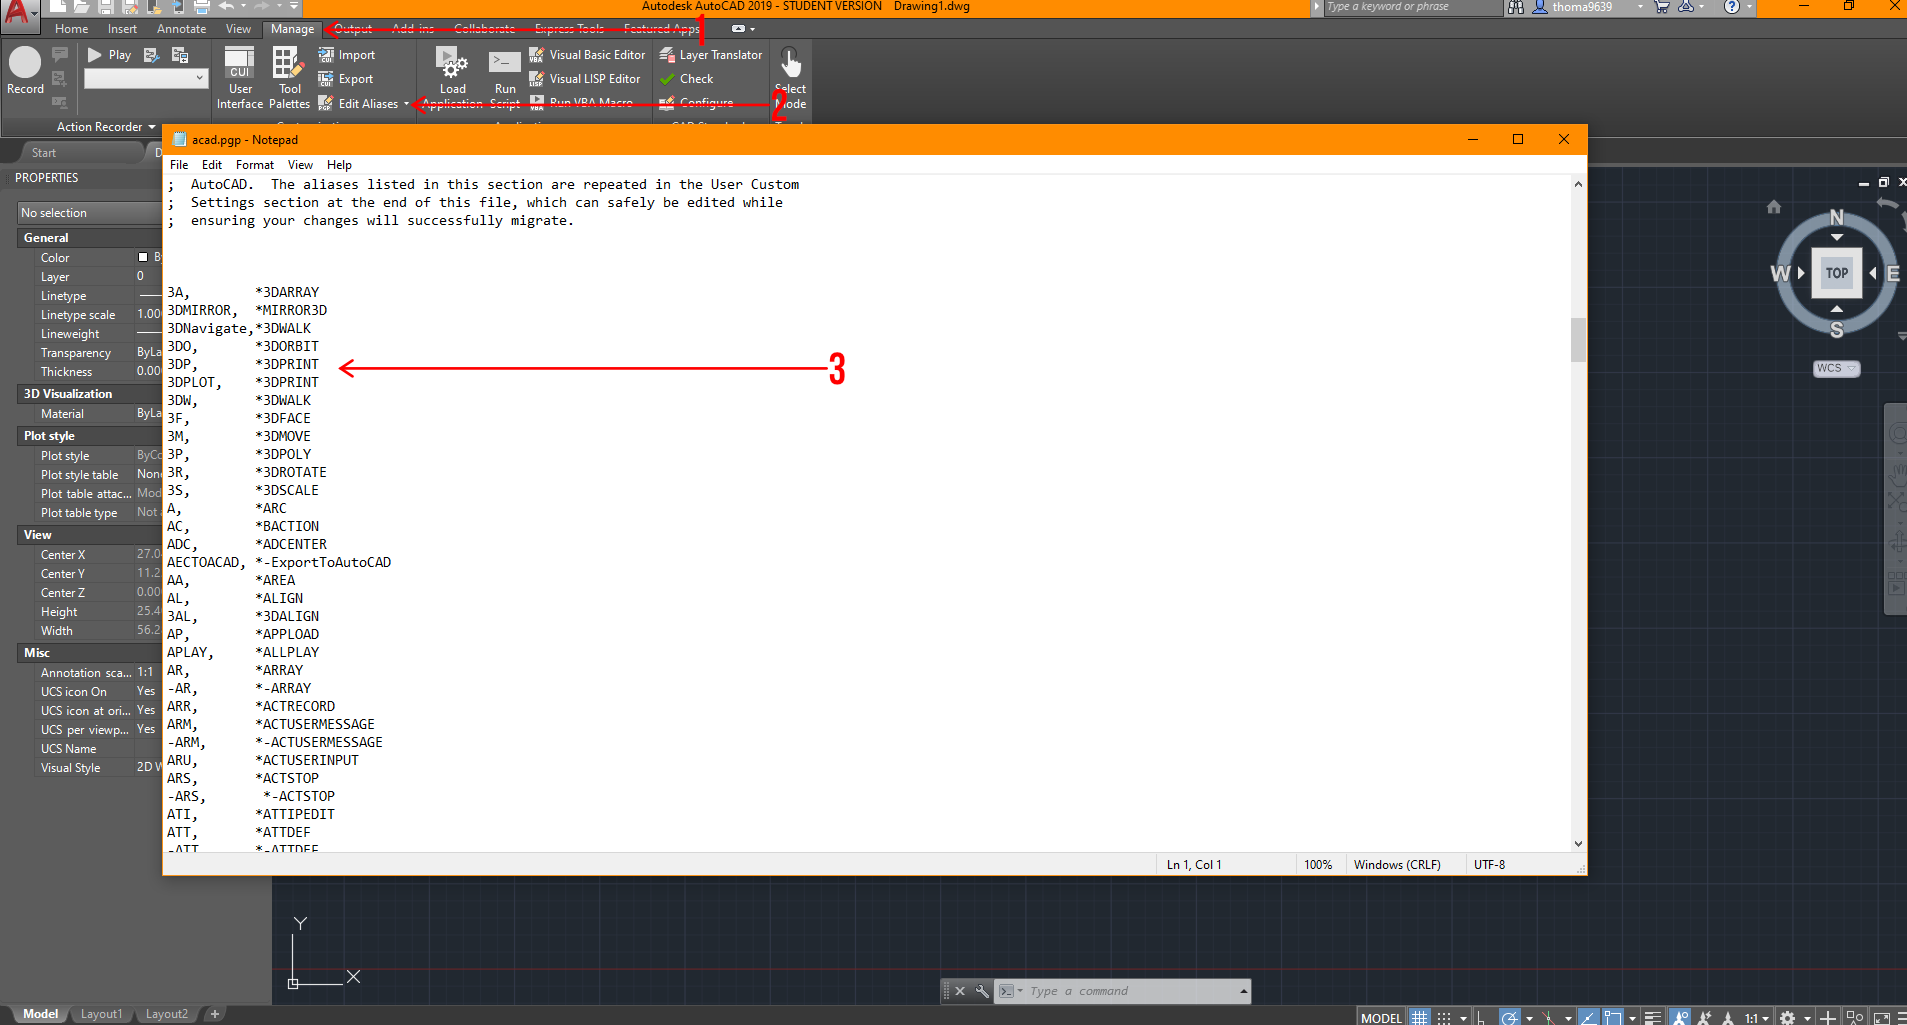
How do you set up your own shortcuts? When you open up AutoCAD, you’ll want to click on the “Manage” tab, then click on “Edit Aliases,” and this window should pop up.

From here, you can customize all the shortcuts you need to one or a few keys to do multiple tasks. It’s important to make sure there are no duplicates in this notepad, or AutoCAD will be confused about what you are attempting to achieve.
Interface Customization

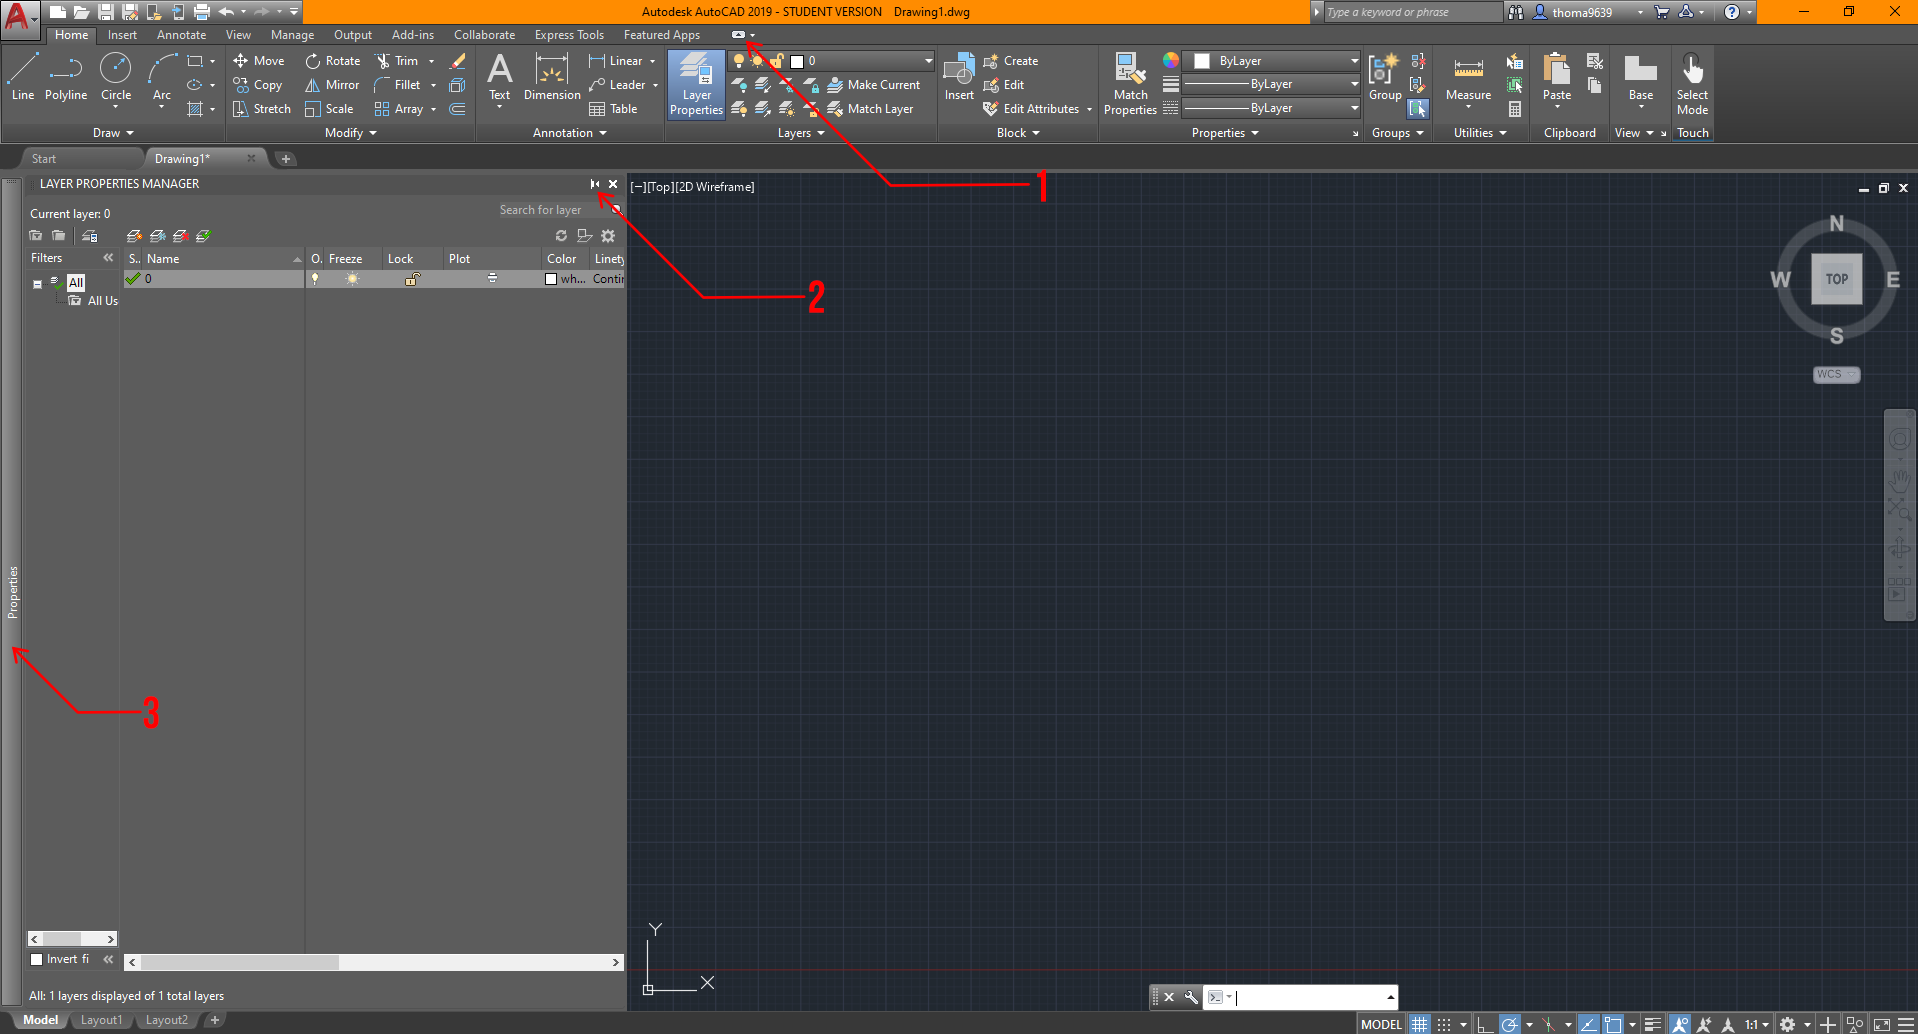
Just like shortcut customization, interface customization is the next best thing to get situated with. When I’m opening a new software, the first thing I always ask is “How do I switch this to black or dark scheme?” Luckily, it’s effortless. Type “Settings” in the command bar, and a window will pop up, which will give you multiple options to adjust the display, drafting, or user preferences settings. Take the time to explore those options and adjust to your liking! In addition, there are other ways to customize your interface, and I’ll break down some things in the image below,

  1. This button controls the ribbon area, and you can cycle through multiple settings depending on how you like it. I normally go with the ribbon option shown in the image because it’s easier to navigate than the others.
  2. This option is available for most pop-up tabs that occur in AutoCAD. This symbol essentially asks if you’d like this window to be added to your sidebar. It also toggles whether you want the tool window to stay locked or hidden when not used.
  3. The sidebar is where you’d find any anchored tool window you’d like. I usually keep my properties tab locked but place my “Layer Properties” and “External References” anchored and automatically withdrawn if not used to the side for quick access.

Utilizing Blocks

Looking back, I realized how much time I wasted without using blocks. Instead of repeatedly deleting and copying objects, I could have made changes to one block and it will change all of them in AutoCAD! Blocks essentially allow you to edit multiple instances of the same block at once.

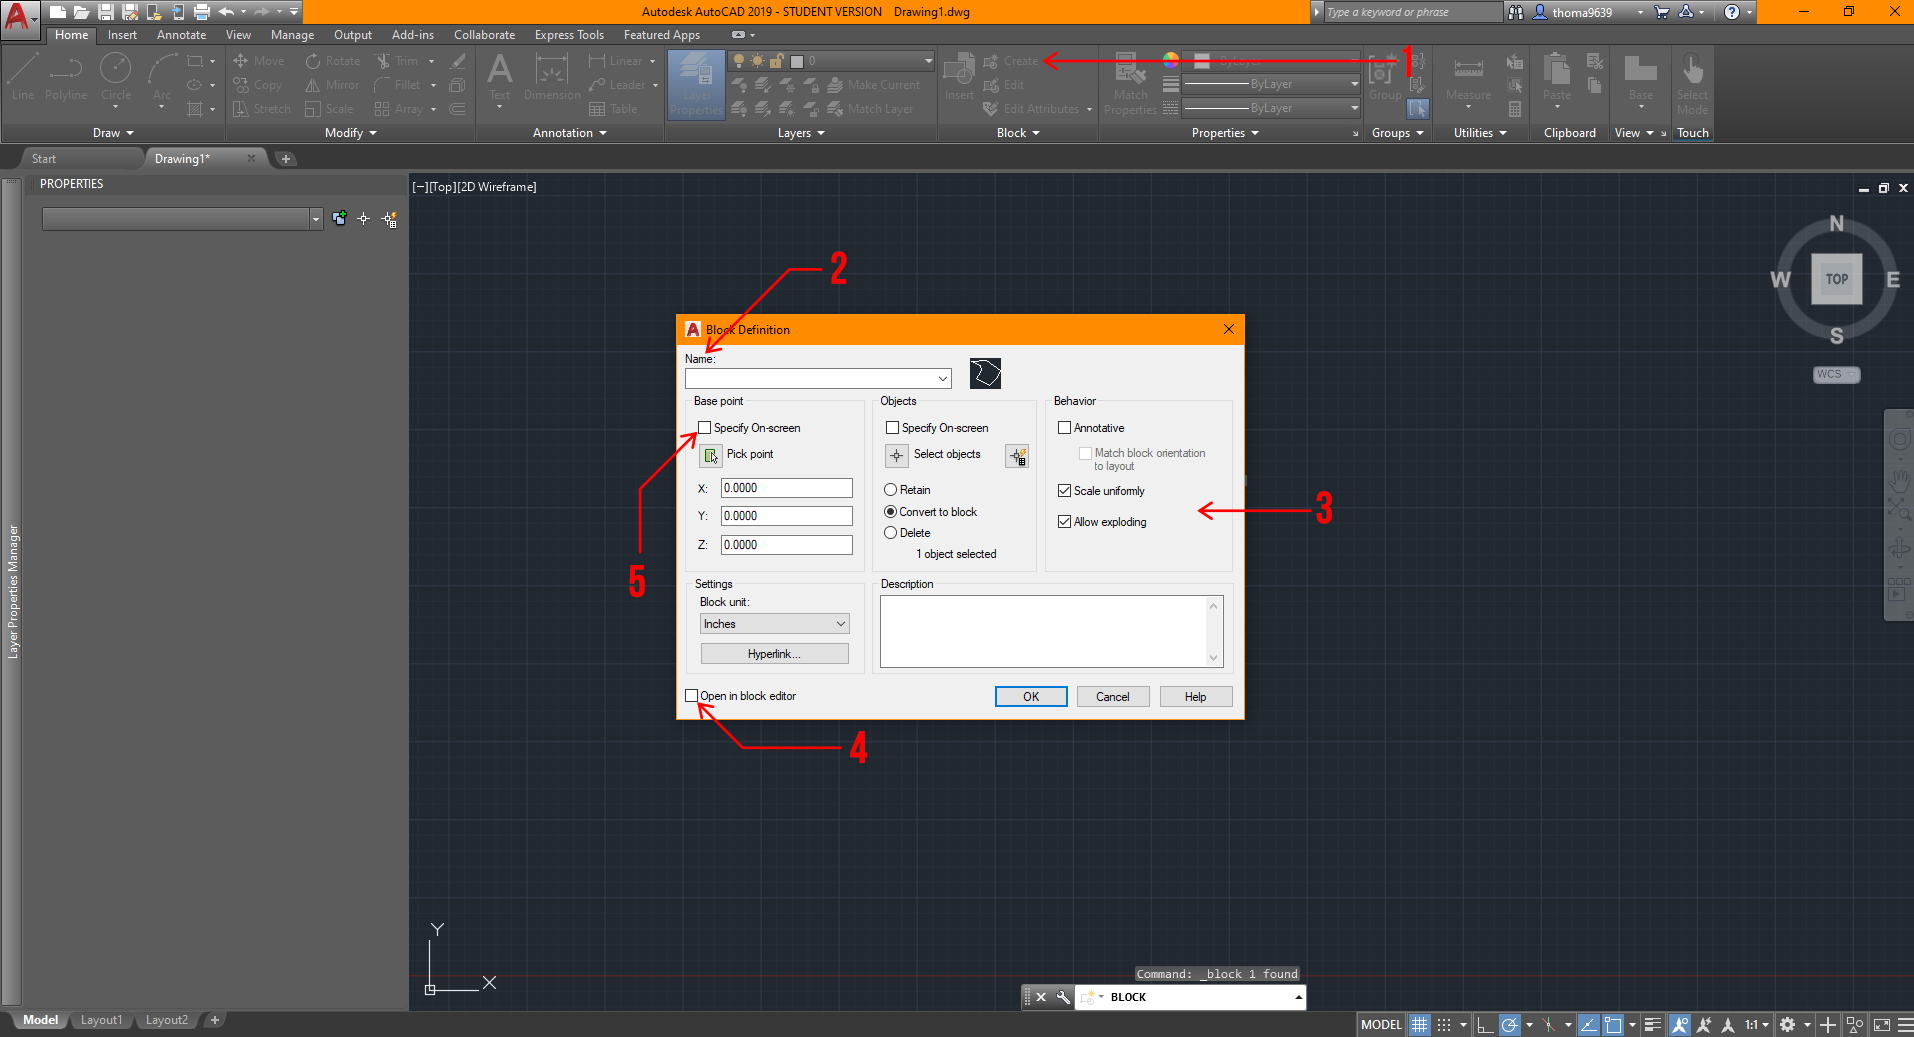
There are two effortless ways to access it: option 1 is found under the “Home” ribbon, where you can go over to the block tab to create or insert any blocks. Option 2 is housed under the “Insert” ribbon — there’s a bigger block tab that can help you learn what the image stands for, but either option will get you to the same result. Ideally, you’d want to create the object first using any tools under the option and modify tab. Once you’ve done that, select the lines, then click the “Create Block” button and this window should pop up.

You can choose to select the object after, but I find it easier and quicker to select the lines or objects first before creating the block.
  1. Click this button for the “Block Definition” window to pop up after selecting the lines and/or objects for the block.
  2. This is where you should name the block so it will save you time finding it!
  3. These are some settings you’d want to adjust eventually; for your sake, the settings shown will be ideal before adjustments.
  4. It’s ideal to uncheck this box because it’s unnecessary to edit the block right away if you’ve drawn it correctly beforehand. Don’t worry, you can always edit the block by right-clicking the object and finding the “Edit Block” option.
  5. Make sure to select this option to set the base point of the block. Otherwise, it may cause complications later on!

Utilizing xRefs or xReferences

Another great hack in AutoCAD is learning how to operate xRefs; they are essentially any viable file that can be placed into the drawing to use as a reference, like PDFs, JPGs, or other AutoCAD files (DWGs). This could be extremely helpful if you were making an addition to other projects, or your project has specific site conditions you’d want to display.

This is also great practice in professional settings for several reasons. First, it allows multiple people to work on different files and still reference each others’ work. Second, it keeps each file clutter-free, lightweight, and focused on the relevant parts of the project. Third, it allows you to swap out versions or iterations by replacing xRefs quickly. Here’s how you can bring one in:

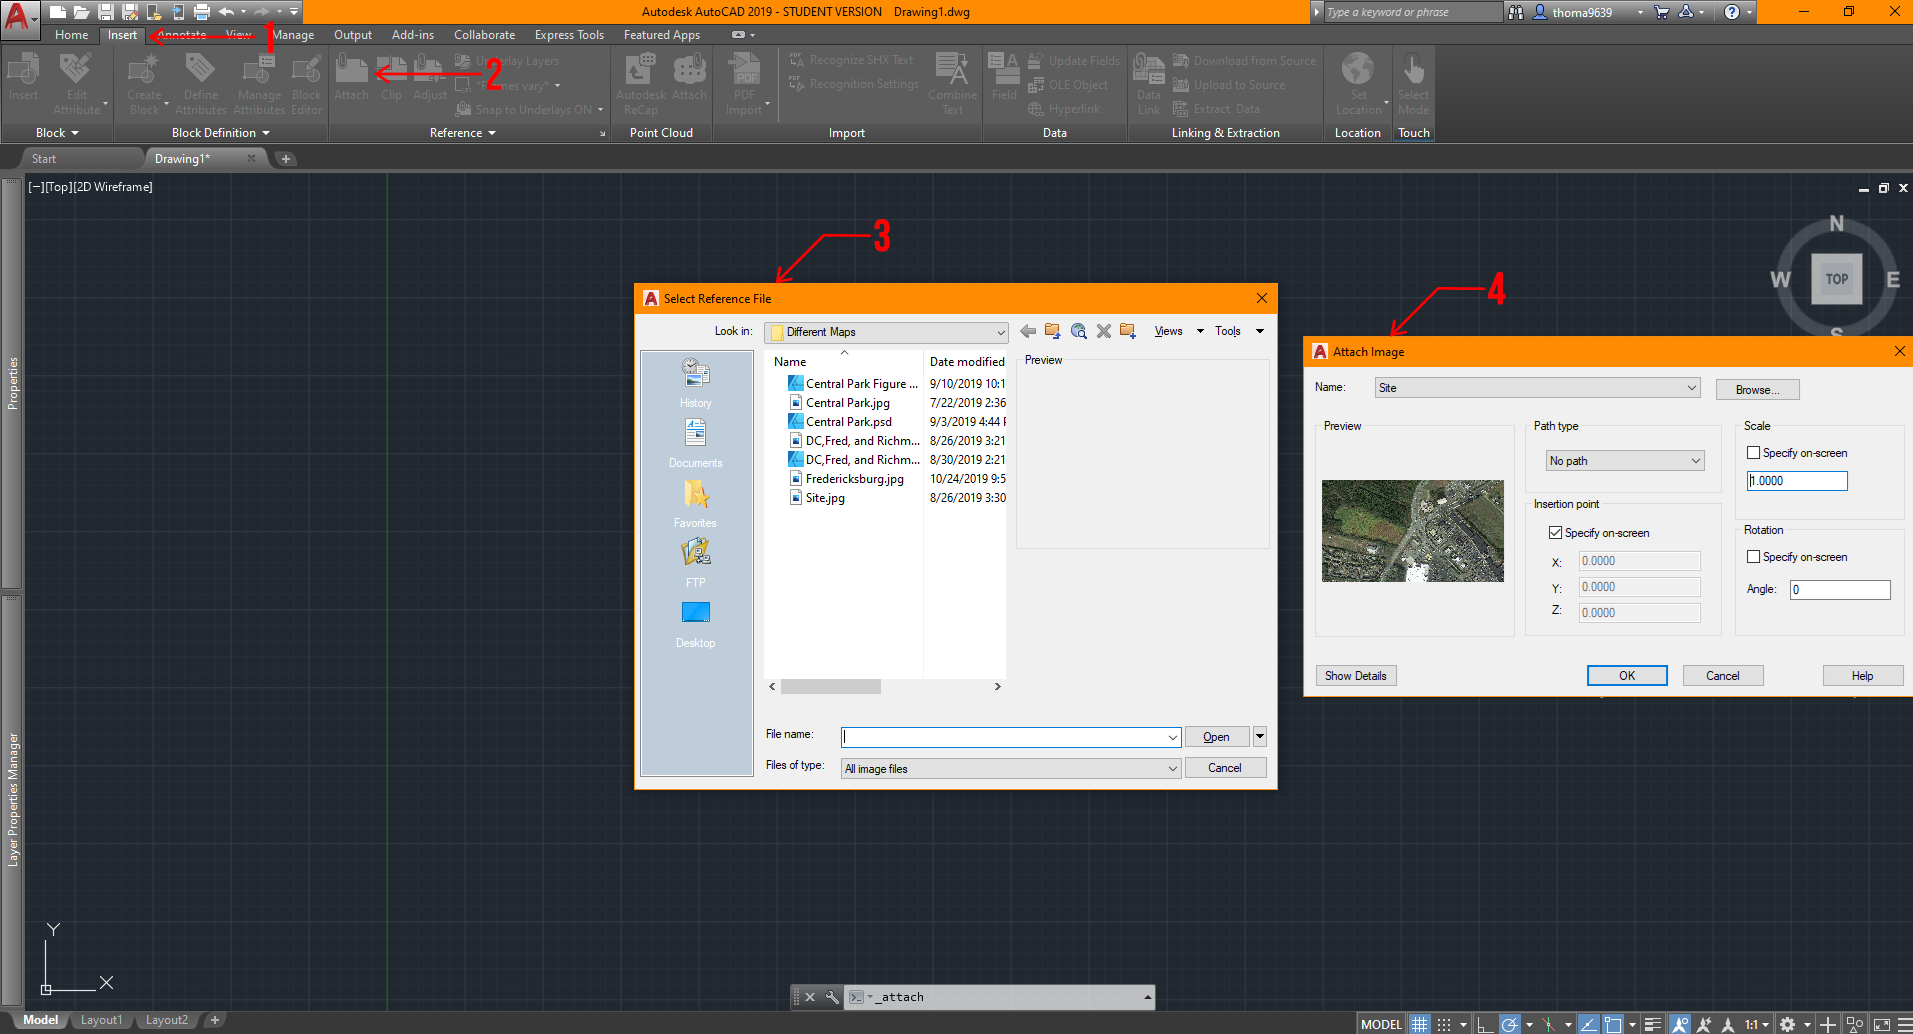
  1. Click on the “Insert” ribbon.
  2. After that, go ahead and click on “Attach.”
  3. This window will pop up for you to select what file you want to use as a reference.
  4. After making your selection, a second window will pop up, and I have already set general settings for your convenience. You could make more adjustments to these settings once you have learned the process!

Sheet Layout + Viewport Control

Let’s say you want to export a drawing without certain features but don’t want to waste time to recreate it or copy multiple views causing your file to slow down. What do you do? Sheets and viewport control are your best friend! Now, I never really used this feature until I began working, but still, I’m sure it will save you some time too! Assuming that you have a drawing in AutoCAD and it’s situated near the origin (0,0) in the model space, here are the steps you can do to maximize your efficiency in exporting views.

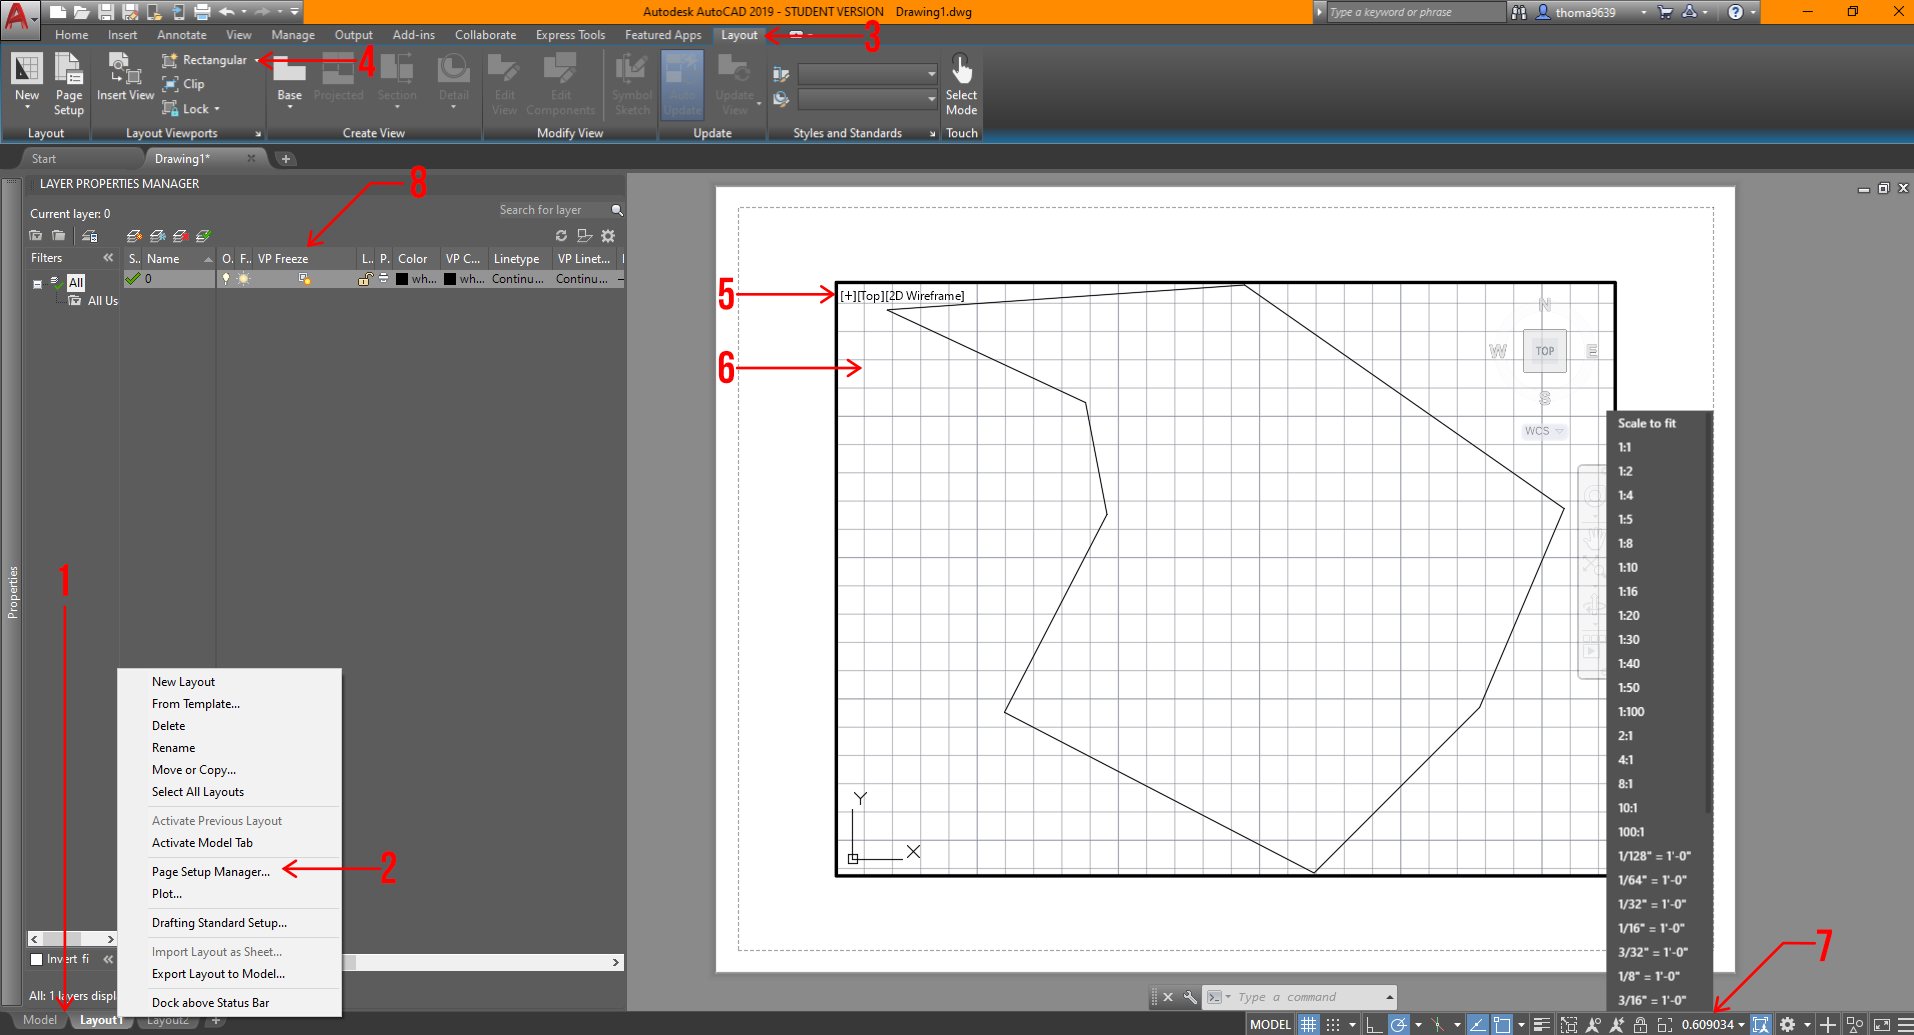
  1. In AutoCAD, the space you work in is called the “Model” space, so if you want to control your sheets for drawings and views, you will want to click on the tabs below to set that up. You can add sheets by hitting the “+” sign or right-click on a tab to add a sheet.
  2. You should confirm the sheet size or settings you will want to export the drawing in by right-clicking the sheet tabs and clicking the “Page Setup Manager” option. From there, another window will open and a few more adjustments based on your needs.
  3. Select this tab to create a viewport or view on the sheet. Viewports is another way to see your drawing, imagine it’s a camera snapshot of the model space, which you can control certain settings that won’t affect the model space!
  4. To create a viewport, click on this item. Now, you can have organic-shaped viewports, but in this scenario, let’s keep it simple. Once you click on it, all you have to do is draw a rectangle that fits your sheet, and you can always adjust if needed.
  5. This is the rectangular viewport.
  6. You can double-click into the viewport and use the mouse wheel to locate what you want visible in the box. If you want to exit the viewport space, double-click on the sheet or the colored edge surrounding the drawing.
  7. After selecting the frame of the viewport, you can control the scale of the drawing by clicking on the scale symbol at the bottom right corner. Make sure to lock the view by clicking the lock symbol next to the scale symbol. This makes your viewport fixed on what you are showing.
  8. You can turn off layers in specific viewports by opening your “Layer Properties,” finding the tab that says “VP Freeze,” and clicking on the symbol with the sun. This is similar to freezing a layer, but instead of turning it off for the entire file, it will only turn it off for that view.

This is a rather advanced technique in AutoCAD, so there’s a lot of playing around with this last one. However, if you learn this sooner, especially with the iterative process of school and work, it can save you a lot of time and headaches.

These tips vary in levels of understanding of AutoCAD; nonetheless, these should help you learn the software even faster. That’s all we got for today! I hope you found this article helpful, and if you have any tips for future students, please let us know in the comments below. Make sure to follow Archi Hacks’ YouTube and Instagram for more content.

Send Us a Rendering. Tell Us a Story. Win $2,500! Architizer’s 3rd Annual One Rendering Challenge is open for entries, with a Regular Entry Deadline of March 11th, 2022Submit a rendering.


Reference